
If you are looking for a reliable mobile plan with regular billing, generous data allowances, calls, texts, device options, and additional digital services, Globe Postpaid offers several choices for customers in the Philippines. Instead of repeatedly purchasing prepaid promos, a postpaid account gives you a monthly plan with defined inclusions and a recurring billing arrangement.
This complete Globe Postpaid guide explains how to choose a plan, understand application requirements, apply online or in a Globe Store, manage your account, pay your monthly bill, renew your contract, and troubleshoot common problems.
What Is Globe Postpaid?
Globe Postpaid is Globe Telecom’s subscription-based mobile service. Customers choose a monthly plan and receive a package of mobile services based on that plan. Depending on the offer, this can include mobile data, all-net calls and texts, landline calls, device financing, roaming services, rewards, and other benefits.
Globe’s current GPlan lineup includes All-New GPlan PLUS, which is designed as a SIM-only option, and GPlan with Device, which combines a postpaid plan with a smartphone or other device. Globe also offers Platinum plans for customers seeking premium postpaid services.
The best choice depends on how you use your phone. Someone who already owns a good smartphone may prefer a SIM-only plan, while someone planning to purchase a new phone may find a device-bundled plan more suitable.
Globe Postpaid Eligibility and Requirements
Before applying for a Globe Postpaid account, prepare the documents that may be requested during the application and verification process.
Globe’s official GPlan FAQ identifies three broad application requirement categories:
- Proof of identity
- Proof of billing address
- Proof of financial capacity
The exact documents accepted can depend on your applicant profile and the specific application.
Proof of Identity
Common identity documents may include government-issued identification such as a passport, driver’s license, UMID/SSS/GSIS ID, PRC ID, or company ID, depending on the applicant and Globe’s current verification requirements.
Foreign residents and students may need additional identification. Your passport and other supporting documents should be valid and readable.
Proof of Billing Address
Applicants may be asked to provide evidence of their residential or billing address. Examples can include:
- Utility bills
- Bank statements
- Credit card statements
- A notarized lease contract
- Other accepted address certifications
Make sure the information on your documents is clear and consistent with the details submitted in your application.
Proof of Financial Capacity
Because postpaid service involves recurring monthly charges, financial verification may also be required.
Possible supporting documents can include:
- Certificate of Employment
- Payslip
- Income tax documentation
- Bank statement
- Credit card
- Other financial documents accepted during Globe’s verification process
Students or applicants without conventional employment documentation may have additional verification requirements or payment arrangements. Requirements can change, so check the official Globe Postpaid application information before submitting your documents.
Globe Postpaid Plan Options
Globe’s current postpaid ecosystem gives customers different ways to configure their mobile service.
1. All-New GPlan PLUS
The All-New GPlan PLUS is Globe’s SIM-only postpaid option. It is intended for customers who want a postpaid service without necessarily bundling their subscription with a new smartphone.
Current official listings include plans ranging from ₱599 to ₱2,499 per month, with different data allocations. The plans also include unlimited all-net calls and texts, including landline calls, while higher-tier plans provide additional customization features through the GlobeOne app.
For example, the current official page lists:
| Plan | Data | Monthly Price |
|---|---|---|
| GPlan PLUS 599 | 10 GB | ₱599/month |
| GPlan PLUS 799 | 15 GB | ₱799/month |
| GPlan PLUS 999 | 20 GB | ₱999/month |
| GPlan PLUS 1299 | 30 GB | ₱1,299/month |
| GPlan PLUS 1499 | 40 GB | ₱1,499/month |
| GPlan PLUS 1799 | 50 GB | ₱1,799/month |
| GPlan PLUS 1999 | 60 GB | ₱1,999/month |
| GPlan PLUS 2499 | 100 GB | ₱2,499/month |
These figures are based on Globe’s current official plan page and may change as Globe updates its offers.
One of the major advantages of the newer GPlan PLUS structure is flexibility. Eligible plans can allow customers to customize or swap certain inclusions through the GlobeOne app, including data-related services, roaming options, content subscriptions, and other available perks.
2. GPlan with Device
If you want to purchase a smartphone or another supported gadget together with your mobile subscription, GPlan with Device is the alternative to consider.
The plan combines your postpaid service with a selected device. Depending on the offer and device, customers may have different payment and contract options.
Globe’s official FAQ states that GPlan with Device contracts can be 24 or 36 months, depending on the selected device.
Before selecting a device plan, compare:
- Monthly recurring fee
- Device cash-out
- Contract duration
- Included data
- Calls and texts
- Device payment terms
- Available add-ons
- Early termination conditions
How to Apply for Globe Postpaid Online
Applying online can be convenient if you already know which plan you want.
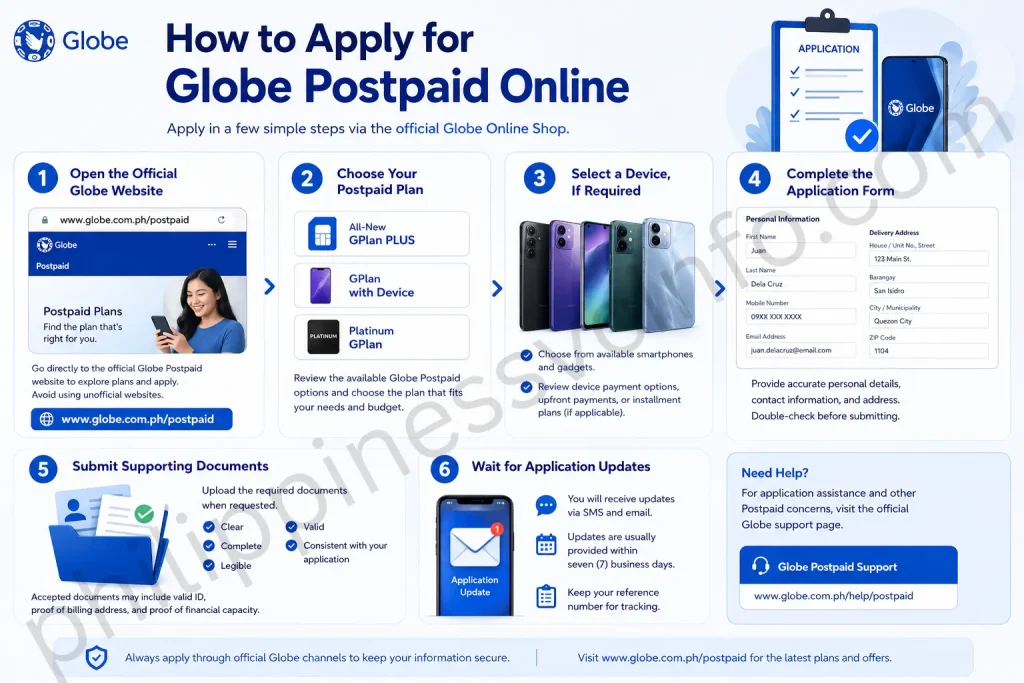
Step 1: Open the Official Globe Website
Avoid entering personal information on unofficial websites claiming to process Globe applications. Use Globe’s official website or an official Globe Store for your application.
Step 2: Choose Your Postpaid Plan
Review the available Globe Postpaid options and decide whether you want:
- All-New GPlan PLUS
- GPlan with Device
- A Platinum GPlan, if eligible and appropriate for your needs
Consider your normal monthly data usage before choosing a plan. A higher-priced plan is not automatically better if you rarely consume the additional data.
Step 3: Select a Device, If Required
If you choose GPlan with Device, select an available smartphone or gadget.
Review the device payment requirements carefully. Some device offers may have upfront payments or installment arrangements, depending on the current offer.
Step 4: Complete the Application Form
Provide the requested personal information, contact details, address, and other application information.
Double-check your details before submitting. Incorrect information can delay verification.
Step 5: Submit Supporting Documents
Upload the required documents when requested. Make sure photographs or scanned copies are:
- Clear
- Complete
- Legible
- Valid
- Consistent with your application information
Step 6: Wait for Application Updates
After submission, keep your reference information and monitor the contact details used in your application.
Globe’s current application page says applicants can receive updates through text or email, with updates stated as being provided within seven business days for the referenced application workflow.
You can also use Globe’s official Postpaid application and support page for application-related information and available support options.
Applying for Globe Postpaid in a Globe Store
If you prefer face-to-face assistance, you can apply through a Globe Store.
Bring the identification and supporting documents relevant to your application. A Globe representative can help you review the available plans, complete the application, and understand the applicable requirements.
Before visiting, it is a good idea to check the current requirements and plan availability online. This can help you avoid making a trip without the documents needed for verification.
Which Globe Postpaid Plan Should You Choose?
The right plan depends primarily on your usage and whether you need a new device.
Choose All-New GPlan PLUS if:
- You already have a compatible smartphone.
- You want a SIM-only postpaid service.
- You prefer more data flexibility.
- You want to customize eligible plan inclusions through GlobeOne.
- You do not necessarily want a long device contract.
Consider GPlan with Device if:
- You need a new smartphone or gadget.
- You prefer combining device and mobile service.
- You are comfortable with the applicable contract period.
- The monthly cost fits your budget.
For current plan availability, inclusions, and promotional offers, check the official Globe Postpaid website because offers and device selections can change over time.
Globe Postpaid Monthly Billing
A Globe Postpaid account normally has a recurring monthly charge based on your selected plan. Your total bill can vary when additional charges are incurred during the billing period.
The main components can include:
- Monthly recurring fee
- Device-related charges, when applicable
- Additional data or add-ons
- Roaming charges
- International calls or messages
- Other applicable out-of-plan charges
- Taxes or other applicable fees
Your actual bill depends on your plan, usage, purchases, and applicable charges.
What Is the Monthly Recurring Fee?
The Monthly Recurring Fee, commonly called the MRF, is the regular charge associated with your selected postpaid plan.
For example, if you subscribe to a ₱999 plan, the recurring plan charge is based on that selected package. However, your final bill may be different if you purchase additional services or incur other applicable charges.
This is why checking your Globe Postpaid statement regularly is useful.
How to Check Your Globe Postpaid Bill
One of the easiest ways to monitor your account is through GlobeOne.

Step 1: Open GlobeOne
Open the official GlobeOne App on your compatible smartphone.
Step 2: Select Your Postpaid Account
If you have multiple Globe accounts connected to your profile, select the relevant Globe Postpaid number.
Step 3: Open the Billing Section
Look for your current bill, billing information, payment status, and other available account details.
Step 4: Review the Charges
Check the statement carefully. Look for your monthly plan charge, device-related charges, add-ons, and other applicable usage charges.
If something appears unfamiliar, review your account activity or contact Globe through its official support channels.
How to Pay a Globe Postpaid Bill
Globe provides several payment methods, allowing customers to choose the option that is most convenient for them.

Pay Through GlobeOne
You can manage your account and access available payment options through the GlobeOne App.
Depending on the payment option currently available to your account, you may be able to use supported cards, e-wallets, or other payment channels.
Always verify that the account number and payment amount are correct before confirming a transaction.
Pay Using GCash
GCash can also be used to pay eligible Globe bills.
Open the official GCash app, select the appropriate bills-payment option, enter the required Globe account information, confirm the amount, and complete the payment.
Keep your transaction confirmation until the payment has been reflected on your account.
Online Banking
Customers can also use supported online banking and bills-payment services.
Depending on the bank, available options may include major Philippine banks and other participating payment partners.
When using online banking, carefully select the correct biller and enter your Globe account information exactly as requested.
Over-the-Counter Payment
Customers who prefer physical payment locations may use participating bills-payment outlets.
Availability of specific bill-payment partners can change, so check Globe’s official payment channels and support information before visiting an outlet.
Late Globe Postpaid Bill Payment?
A postpaid account should be paid by the stated due date. If a bill remains unpaid, account restrictions or applicable charges may occur depending on the circumstances.
If your service has been affected because of an overdue balance, settle the outstanding amount through an available official payment channel and check your account afterward.
For payment-related concerns, use Globe Help rather than relying on unofficial social media pages or third-party payment instructions.
Managing Your GlobeOne Account
The GlobeOne App is designed to bring many Globe services into one account-management platform.
Depending on your account and the services currently supported, GlobeOne can help you:
- Monitor your data usage
- Check your bill
- Pay your account
- View account information
- Manage eligible subscriptions
- Purchase available add-ons
- Manage roaming services
- Check available offers
- Access account-related support
You can find information about GlobeOne through the official GlobeOne page.
Adding Your Globe Postpaid Account to GlobeOne
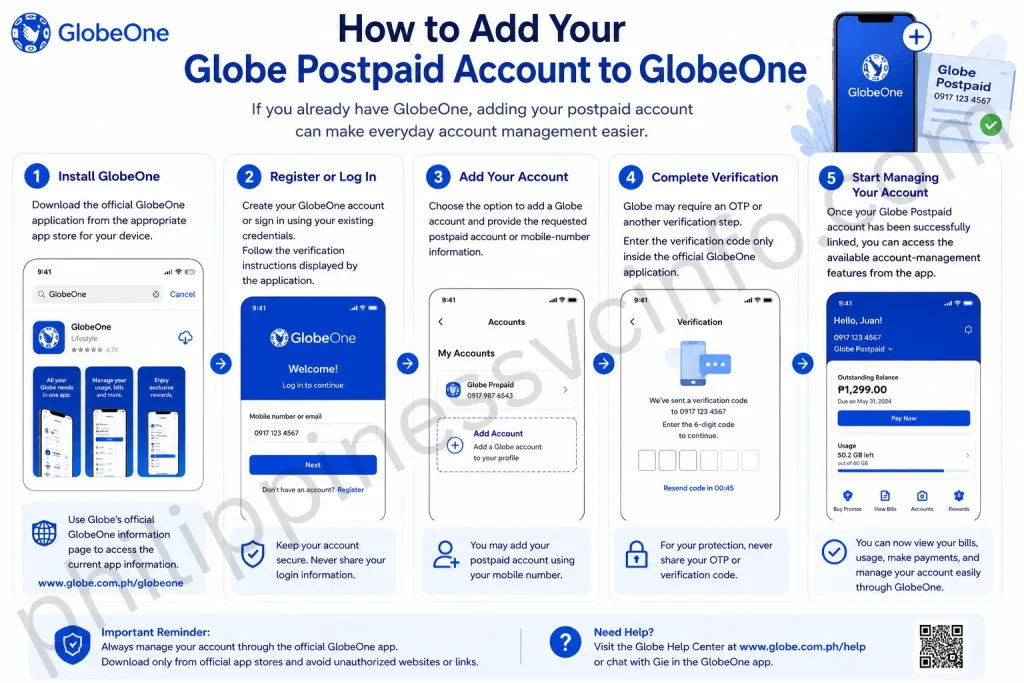
If you already have GlobeOne, adding your postpaid account can make everyday account management easier.
Step 1: Install GlobeOne
Download the official GlobeOne application from the appropriate app store for your device.
Use Globe’s official GlobeOne information page to access the current app information.
Step 2: Register or Log In
Create your GlobeOne account or sign in using your existing credentials.
Follow the verification instructions displayed by the application.
Step 3: Add Your Account
Choose the option to add a Globe account and provide the requested postpaid account or mobile-number information.
Step 4: Complete Verification
Globe may require an OTP or another verification step. Enter the verification code only inside the official GlobeOne application.
Step 5: Start Managing Your Account
Once your Globe Postpaid account has been successfully linked, you can access the available account-management features from the app.
How to Monitor Globe Postpaid Data Usage
Regularly checking your data consumption can help prevent unexpected usage or the need for additional data.
Open GlobeOne and select your postpaid account. The dashboard can display your available or consumed data depending on the current account interface.
Pay particular attention to:
- Remaining data
- Data already consumed
- Data expiration or validity where applicable
- Active data add-ons
- Roaming data
- Other account inclusions
If your data usage appears unusually high, check the applications and services running on your phone as well as your Globe account activity.
Globe Postpaid Add-Ons
Some Globe Postpaid customers may have access to additional data, roaming, entertainment, or other services.
The availability of specific add-ons depends on your plan and current Globe offers.
Before purchasing an add-on, check:
- The price
- Validity period
- Included service
- Activation conditions
- Renewal or recurring-payment conditions, if applicable
GlobeOne is a convenient place to review eligible offers and account services.
Globe Postpaid Roaming
If you plan to travel outside the Philippines, review your roaming requirements before leaving.
Depending on your plan and destination, roaming services may involve additional charges or specific roaming packages.
A practical preparation process is:
- Check your roaming eligibility.
- Review available roaming offers.
- Activate an appropriate roaming service or promo if required.
- Enable data roaming on your phone when necessary.
- Monitor roaming usage carefully.
For current roaming options and instructions, use Globe’s official Roaming page.
Do not assume that your regular domestic data allocation will work overseas under the same conditions. International usage can have different rates and rules.
Globe Postpaid Upgrade Guide
An upgrade can be useful when your current plan no longer provides enough data or when you want a newer device.
Before upgrading, consider:
- Your current monthly cost
- Your average data consumption
- Remaining contract obligations
- New device cost
- Available plan inclusions
- Additional monthly charges
If the upgrade involves a significantly different plan or device, Globe may require additional verification or updated information.
Globe Postpaid eSIM and SIM Options
Depending on the current offer and device compatibility, Globe customers may have physical SIM and eSIM options.
An eSIM is a digital SIM profile that can be installed on a compatible device without inserting a physical SIM card.
If you want to change from a physical SIM to an eSIM, check Globe’s current eSIM information and follow the official activation or conversion instructions.
Before converting, make sure your smartphone supports eSIM and that you understand the requirements shown during the process.
Tips for Managing Your Globe Postpaid Account
Following a few simple habits can make postpaid account management easier.
Check Your Bill Every Month
Do not wait until the due date. Review your bill as soon as it becomes available.
Monitor Data Usage
If your plan includes a fixed amount of data, regularly check your usage through GlobeOne.
Keep Payment Records
Save your payment confirmation, transaction reference, or receipt until the payment has successfully posted to your account.
Keep Your Contact Information Updated
Make sure Globe has accurate contact information so you can receive important account notifications.
Review Your Contract Before Renewal
Do not focus only on the device. Compare the total monthly commitment, contract duration, data allocation, and other inclusions.
Use Official Globe Channels
For applications, payments, account changes, roaming, and troubleshooting, start with globe.com.ph or an official Globe application.
Globe Postpaid No Data or No Signal
One of the most common problems is losing mobile data or experiencing weak or unavailable signal.
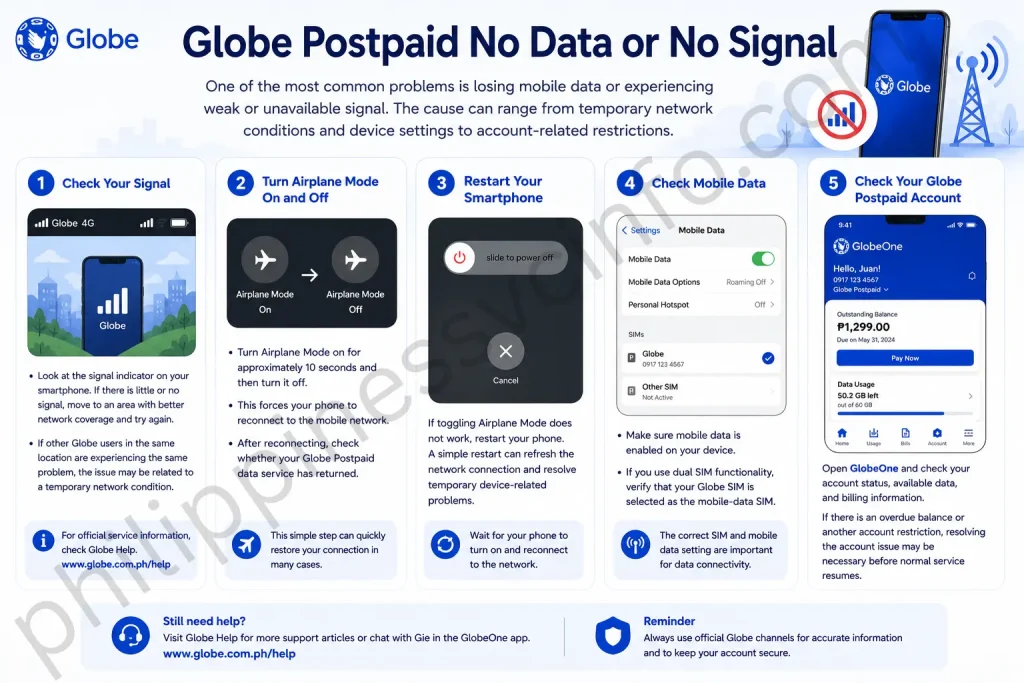
The cause can range from temporary network conditions and device settings to account-related restrictions.
Step 1: Check Your Signal
Look at the signal indicator on your smartphone. If there is little or no signal, move to an area with better network coverage and try again.
If other Globe users in the same location are experiencing the same problem, the issue may be related to a temporary network condition.
Step 2: Turn Airplane Mode On and Off
Turn Airplane Mode on for approximately 10 seconds and then turn it off.
This forces your phone to reconnect to the mobile network.
After reconnecting, check whether your Globe Postpaid data service has returned.
Step 3: Restart Your Smartphone
If toggling Airplane Mode does not work, restart your phone.
A simple restart can refresh the network connection and resolve temporary device-related problems.
Step 4: Check Mobile Data
Make sure mobile data is enabled on your device.
If you use dual SIM functionality, verify that your Globe SIM is selected as the mobile-data SIM.
Step 5: Check Your Globe Postpaid Account
Open GlobeOne and check your account status, available data, and billing information.
If there is an overdue balance or another account restriction, resolving the account issue may be necessary before normal service resumes.
Globe Postpaid APN Settings
Incorrect APN settings can prevent mobile data from working correctly.
For the APN configuration specifically provided in your supplied guide, the APN is:
internet.globe.com.ph
If you need to change APN settings, use your phone’s mobile-network settings and enter only information confirmed by Globe for your device and account.
Because device interfaces vary between Android and iPhone models, it is better to follow Globe’s current device-specific instructions rather than applying settings from an unofficial website.
Globe Postpaid Calls Not Working
If you cannot make outgoing calls, first determine whether the issue affects one number or all numbers.
Try the following:
- Check your phone’s signal.
- Restart the device.
- Turn Airplane Mode on and off.
- Check your Globe Postpaid account in GlobeOne.
- Check whether your bill is overdue.
- Review any available spending or usage limits.
- Try calling another number.
If your account has an outstanding balance or another restriction, settle the required amount through an official payment channel.
Globe Postpaid SMS Problems
If calls work but SMS messages do not, restart your phone and check the network connection.
You should also verify that:
- The recipient’s number is correct.
- Your device has network signal.
- Your account is active.
- You have not reached an applicable usage or spending restriction.
- The issue is not limited to a particular recipient.
If the problem continues, use an official Globe support channel for account-specific troubleshooting.
Globe Postpaid Roaming Not Working
International roaming problems can be frustrating, especially when you need your phone while traveling.
If your Globe Postpaid roaming service is not working, check the following.
1. Confirm Roaming Availability
Before traveling, check whether roaming is available for your destination and whether your plan requires activation or a specific roaming package.
2. Enable Data Roaming
If you need mobile data overseas, make sure Data Roaming is enabled in your smartphone’s settings.
Do not enable roaming blindly if you do not understand the applicable charges. International usage can result in additional costs.
3. Check for a Roaming Promo
Depending on your destination and account, you may have access to roaming packages or promos.
Review available options through official Globe channels before purchasing.
4. Restart Your Device
After activating roaming or changing roaming settings, restart your phone or briefly toggle Airplane Mode.
This can help your device reconnect to an available partner network.
Globe Postpaid SIM and eSIM Issues
A damaged physical SIM or an improperly installed eSIM profile can cause connectivity problems.
If your physical SIM is not detected:
- Restart your smartphone.
- Check whether the SIM is properly inserted.
- Test the SIM in a compatible device if appropriate.
- Check whether the issue is related to the device or the account.
- Contact Globe if the SIM remains inactive.
For eSIM customers, make sure the device supports eSIM and that the correct eSIM profile is installed.
Use Globe’s official eSIM information for the current conversion and activation process.
What to Do If Your Globe Postpaid SIM Is Lost
If you lose your phone or SIM, act quickly.
The priority is to protect your account and prevent unauthorized use.
Contact Globe through an official support channel and ask about the appropriate SIM replacement or account-protection procedure.
You can start with Globe Help or visit a Globe Store through the official Globe Store Locator.
Avoid sharing your OTP, password, account PIN, or other security information with anyone claiming to represent Globe through an unofficial channel.
Globe Postpaid Billing Dispute
If you notice a charge you do not recognize, review your bill and account activity first.
Check whether the charge could be:
- An activated add-on
- Roaming usage
- International calls
- Additional data
- Device-related charges
- Another service associated with your account
If you still cannot identify the charge, contact Globe through an official support channel and provide the relevant billing details.
Keep your payment receipts and transaction references because they may help when investigating an account issue.
How to Cancel Globe Postpaid
If you no longer want your Globe Postpaid service, do not simply stop paying your bill.
Instead, confirm the formal cancellation procedure with Globe.
Before requesting cancellation, check:
- Current outstanding balance
- Contract status
- Device obligations
- Possible pre-termination charges
- Final bill
- Any remaining installment obligations
If your plan is still within a contract period, terminating it early may result in applicable fees.
What Happens to a Device When You Cancel?
If your Globe Postpaid plan includes a device, cancelling before the contractual period ends can involve remaining financial obligations.
The exact amount depends on the account, device, plan, contract, and applicable terms.
Therefore, do not assume that paying only the current monthly bill will automatically end your device obligation.
Ask Globe for the exact account-specific amount before submitting a cancellation request.
How to Renew Globe Postpaid
When your contract approaches its end, review your renewal options before making a decision.

A renewal may allow you to select a new plan or device depending on the offers available for your account.
A practical renewal process is:
- Open the GlobeOne App.
- Review your current account and contract information.
- Check available renewal offers.
- Compare monthly fees and inclusions.
- Review any device cash-out or installment costs.
- Read the new terms carefully.
- Complete the renewal process through the official Globe channel.
If your account does not show renewal options, contact Globe directly for assistance.
Final Tips for Globe Postpaid Customers
Managing a Globe Postpaid account is easier when you regularly monitor your account rather than waiting for problems to appear.
Keep these practices in mind:
- Check your bill every month.
- Monitor your mobile-data usage.
- Pay before the stated due date.
- Keep payment receipts and transaction references.
- Review your plan before renewal.
- Check roaming rates before traveling abroad.
- Use GlobeOne for supported account-management functions.
- Keep your personal and contact information updated.
- Never share OTPs or account security information with unknown individuals.
- Use only official Globe websites, applications, stores, and support channels.
Official Globe Postpaid Resources
For reliable and current information, use Globe’s official resources:
- Globe Official Website
- Globe Postpaid
- GlobeOne
- Globe Help
- Globe Stores
- Globe International Roaming
- Globe eSIM
Frequently Asked Questions About Globe Postpaid
Conclusion
Globe Postpaid can be a convenient choice for customers who want reliable monthly mobile service, generous data allocations, calls and texts, device options, and convenient digital account management. Choosing the right plan is important, so compare the available options with your actual usage and budget before applying. After activation, use GlobeOne to monitor your account, check bills, track data usage, make payments, and manage eligible services. For billing, renewal, roaming, SIM, cancellation, or technical concerns, always use official Globe resources because plans, fees, requirements, devices, and procedures may change. By using official channels and regularly monitoring your account, you can manage your Globe Postpaid service more efficiently and reduce common billing, payment, and connectivity problems.
Discover What You Need to Know:
- DITO App: Complete Guide to Download, Login, Load, Promos & Account Management
- DITO eSIM Philippines: Complete Registration & Activation Guide 2026
- SIM: Complete Guide to SIM Cards, eSIM, Types, Activation & Registration 2026
- Globe eSIM Philippines: Buy, Install, Register & Activate Online 2026
- GOMO SIM Registration Guide: Register, Verify & Activate Your SIM Online 2026
- Smart eSIM Activation: Complete Philippines Setup & Registration Guide 2026