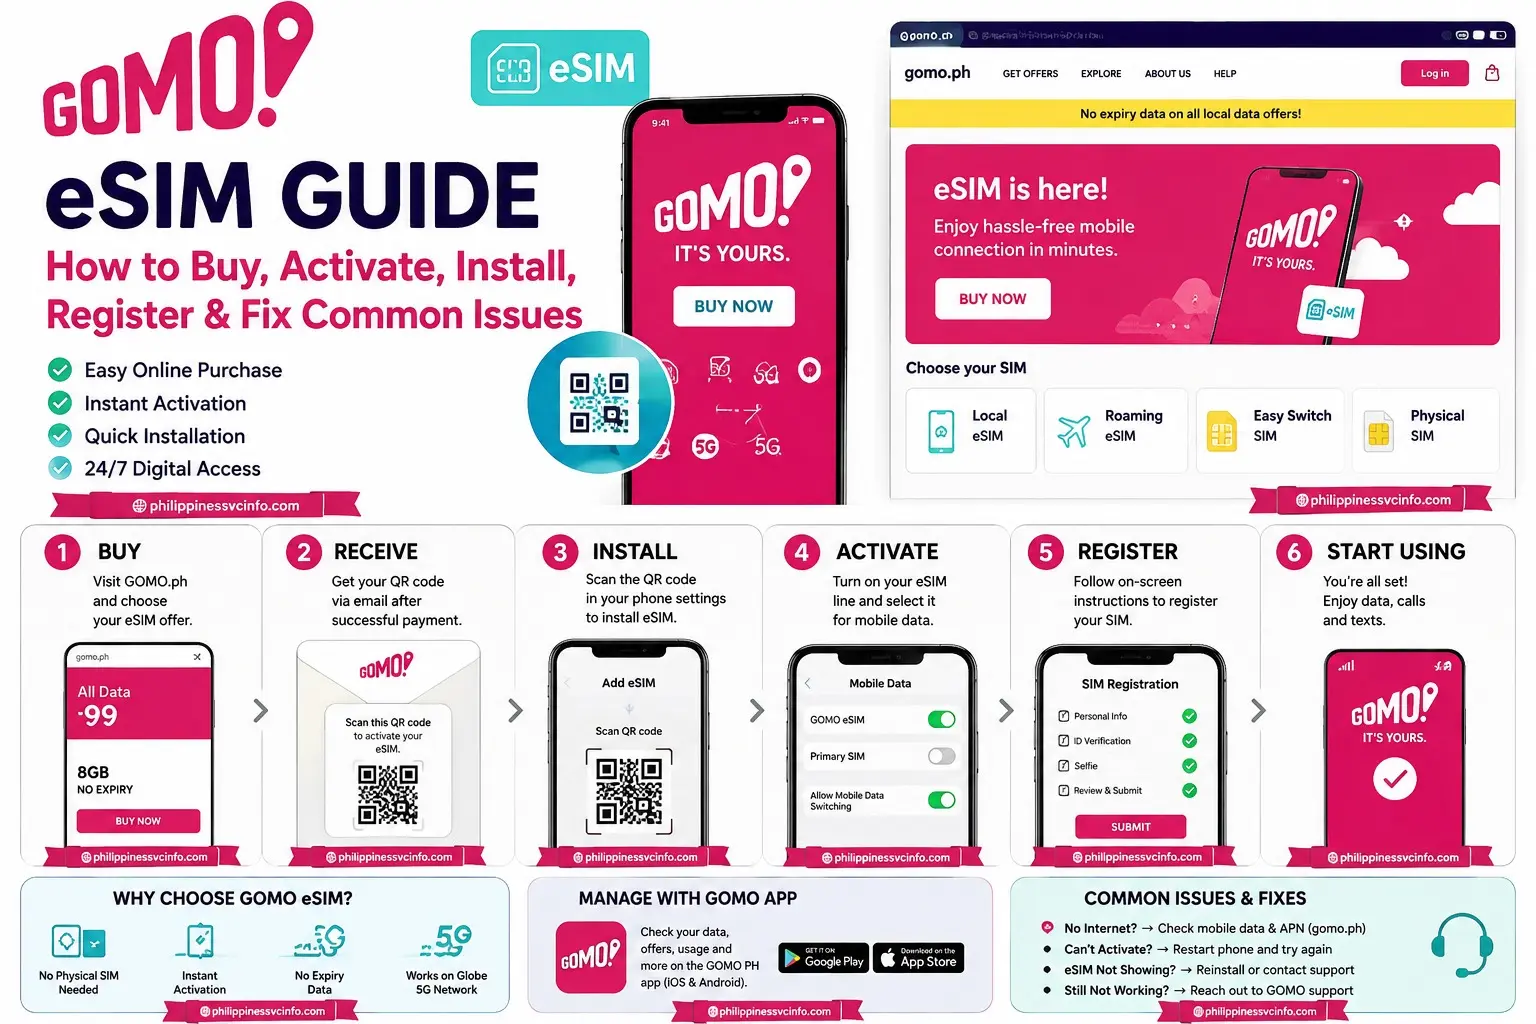
GOMO eSIM gives users a convenient digital alternative to a traditional physical SIM card. Instead of inserting a plastic SIM into a phone, a compatible device can install the GOMO eSIM electronically. This makes the setup process particularly useful for people who prefer digital connectivity, compatible dual-SIM devices, and a simpler SIM installation experience.
The official GOMO website provides separate options for Local eSIM, Roaming eSIM, Physical SIM, and Easy Switch SIM, so users should select the product that matches their needs before completing a purchase.
Important: GOMO offers, prices, availability, and product details may change. Always check the official GOMO website or GOMO PH app before purchasing.
What Is GOMO eSIM?
A GOMO eSIM is an electronic SIM profile that allows a compatible smartphone to connect to GOMO mobile services without requiring a removable physical SIM card. Rather than receiving a plastic card and inserting it into the phone, the user obtains the appropriate GOMO eSIM and installs it digitally on an eSIM-compatible device.
The GOMO website separates local and roaming eSIM products, which is important because a Local eSIM and a Roaming eSIM serve different purposes. A user who needs regular Philippine GOMO service should check the Local eSIM category, while someone traveling internationally should review the available roaming products.
GOMO eSIM vs Physical SIM
| Feature | GOMO eSIM | Physical GOMO SIM |
|---|---|---|
| Physical card | No | Yes |
| Installation | Digital | Insert SIM card |
| Compatible device | eSIM support required | Physical SIM slot required |
| Mobile data | Yes | Yes |
| Purchase through GOMO | Yes | Yes |
| Dual-SIM use | Depends on device | Depends on device |
The biggest difference is the installation method. With a GOMO eSIM, the SIM profile is installed electronically, while a physical GOMO SIM needs to be inserted into the phone.
What You Need Before Getting a GOMO eSIM
Before purchasing a GOMO eSIM, prepare the basic requirements so the process is less likely to hit a digital pothole.
You should have:
- An eSIM-compatible smartphone
- A reliable Wi-Fi or internet connection during installation
- Access to the official GOMO website or GOMO PH app
- The GOMO offer you want to purchase
- Your personal information when requested during checkout or registration
- A device that is not restricted from using the relevant mobile service
These requirements can vary depending on the specific product. The source information also recommends checking the product details provided by GOMO before completing a purchase.
How to Buy GOMO eSIM Online
One of the main advantages of a GOMO eSIM is that users can begin the purchase process online. GOMO’s official Get GOMO SIM section provides different SIM categories, including Local eSIM and Roaming eSIM.

Step 1: Open the Official GOMO Website
Start by visiting the official GOMO website:
Using the official website is important when purchasing a GOMO eSIM, particularly because the process may involve personal information and payment details.
Step 2: Open Get GOMO SIM
From the GOMO website, open the Get GOMO SIM section.
The official GOMO page provides several product categories, including:
- Easy Switch SIM
- Local eSIM
- Roaming eSIM
- Physical SIM
Step 3: Select Local eSIM
If you need a standard Philippine GOMO eSIM, select the Local eSIM category.
Do not automatically select a roaming eSIM simply because it is digital. GOMO distinguishes between local and roaming products, so reviewing the product category before purchasing can prevent choosing an unsuitable offer.
Step 4: Choose Your GOMO eSIM Offer
Review the available GOMO eSIM packages and select the option that fits your data requirements.
The GOMO page has displayed offers such as:
- 7GB data with no expiry
- 15GB data with no expiry
- 30GB data with no expiry
Availability and pricing can change, so these examples should not be treated as permanent prices or offers. Check the official GOMO page for the current selection before ordering.
Step 5: Select Buy Now
After selecting your preferred GOMO eSIM offer, continue by choosing the purchase option shown on the official GOMO page.
Review the product carefully before proceeding, particularly the data allocation, validity, and product type.
Step 6: Enter the Required Information
Continue through the checkout process and provide the information requested by GOMO.
The official checkout information can include details such as:
- Customer information
- Mobile number
- Birthday
- Gender
- Address information where applicable
- Payment information
Make sure the information you provide is accurate before submitting the order.
Step 7: Complete Payment
Review the order and proceed with the payment option presented by GOMO.
After payment, keep your transaction information or confirmation details. These records may be useful if you later need to verify your purchase or contact support.
How to Activate GOMO eSIM
After obtaining a GOMO eSIM, the next stage is installation and activation. The exact process can vary according to the GOMO product and the phone being used. GOMO product pages include a How to Activate section for its SIM products.

In general, the process involves:
- Confirm that your phone supports eSIM.
- Connect the phone to reliable Wi-Fi or internet.
- Open the phone’s SIM or eSIM settings.
- Choose the option to add an eSIM or mobile plan.
- Follow the activation instructions supplied with your GOMO eSIM.
- Allow the eSIM profile to install.
- Enable the GOMO line.
- Select GOMO for mobile data when necessary.
- Turn on mobile data.
- Test the connection.
Do not delete an installed GOMO eSIM unless you are certain that it can be reinstalled or you have a replacement procedure available.
How to Install GOMO eSIM on iPhone
The exact wording of iPhone menus may vary according to the iOS version, but the general installation flow is straightforward.

Step 1: Open Settings
Open the Settings application on your iPhone.
Step 2: Open Cellular Settings
Tap Cellular or Mobile Service, depending on the device and software version.
Step 3: Select Add eSIM
Choose Add eSIM to begin adding a new digital mobile plan.
Step 4: Follow the GOMO Instructions
Use the installation information supplied with your GOMO eSIM. Depending on the activation method, the phone may ask you to scan a QR code or complete another digital activation procedure.
Step 5: Configure the GOMO Line
Once installed, configure the new line according to how you intend to use it. Options may include:
- Mobile data
- Calls
- Messages
Step 6: Test the Connection
Turn on mobile data and check whether the GOMO connection works correctly. If it does not, continue with the troubleshooting steps later in this guide.
How to Install GOMO eSIM on Android
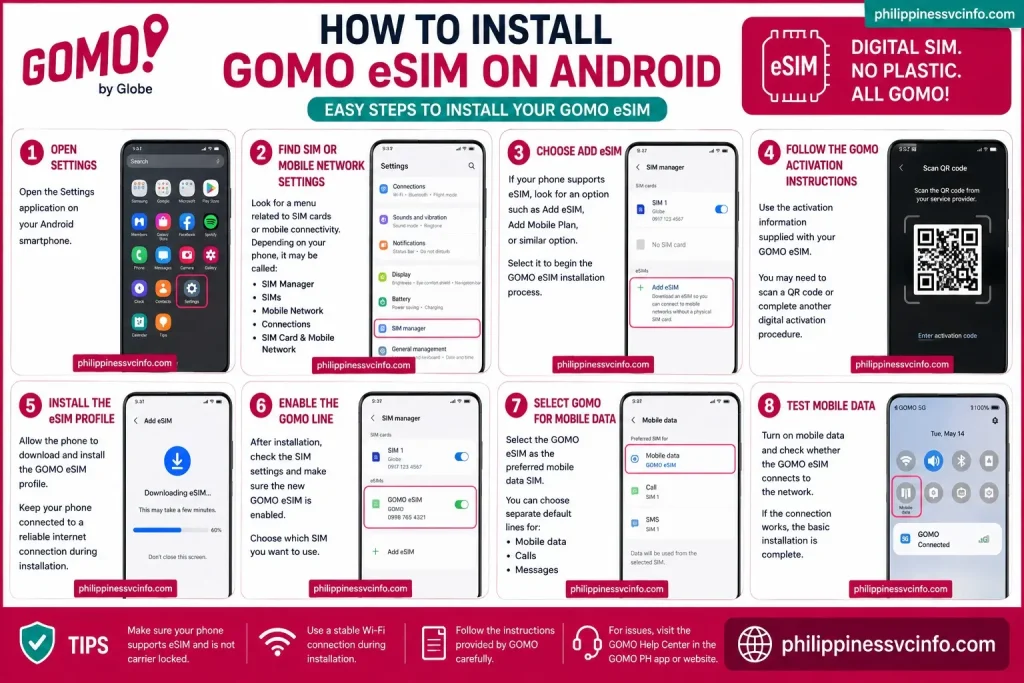
Installing a GOMO eSIM on Android is generally similar to adding any other digital SIM, but the exact menu names depend on the manufacturer and Android version.
Samsung, Google Pixel, Xiaomi, and other Android phones may organize their mobile-network settings differently. Therefore, do not worry if your phone does not use exactly the same wording shown below.
Step 1: Open Settings
Open the Settings application on your Android smartphone.
Step 2: Find SIM or Mobile Network Settings
Look for a menu related to SIM cards or mobile connectivity. Depending on your phone, it may be called:
- SIM Manager
- SIMs
- Mobile Network
- Connections
- SIM Card & Mobile Network
Open the relevant option.
Step 3: Choose Add eSIM
If your phone supports eSIM, look for an option such as Add eSIM, Add Mobile Plan, or a similar option.
Select it to begin the GOMO eSIM installation process.
Step 4: Follow the GOMO Activation Instructions
Use the activation information supplied with your GOMO eSIM.
Depending on the activation method provided by GOMO, your Android phone may ask you to scan a QR code or complete another digital activation procedure.
Follow the instructions carefully rather than entering random network information.
Step 5: Install the eSIM Profile
Allow the phone to download and install the GOMO eSIM profile.
Keep the phone connected to a reliable internet connection during installation. Interrupting the process unnecessarily can make troubleshooting more difficult.
Step 6: Enable the GOMO Line
After installation, check the SIM settings and make sure the new GOMO eSIM is enabled.
If your Android phone contains another physical or digital SIM, confirm which line you want to use for mobile data.
Step 7: Select GOMO for Mobile Data
If necessary, select the GOMO eSIM as the preferred mobile-data SIM.
Your phone may allow you to choose separate default lines for:
- Mobile data
- Calls
- Messages
The available options depend on your specific device.
Step 8: Test Mobile Data
Turn on mobile data and check whether the GOMO eSIM connects to the network.
If the connection works, the basic installation is complete.
If you cannot access mobile data, continue with the troubleshooting section later in this guide.
GOMO eSIM Registration
Installing a GOMO eSIM and completing SIM registration are not necessarily the same step.
The source information indicates that registration or identity verification requirements can be presented separately through GOMO’s official channels. Users should follow the instructions displayed by GOMO instead of assuming that every GOMO eSIM product follows an identical registration process.
When completing registration, make sure the information you provide is accurate.
Information and Security Tips
During a GOMO eSIM registration or verification process:
- Use your own information.
- Enter your mobile number correctly.
- Provide valid information when requested.
- Follow the verification instructions carefully.
- Keep your account details secure.
- Never give an OTP or authentication code to another person.
An OTP should be treated as private account-security information. If someone asks you to send your GOMO verification code, do not share it.
For additional protection, always check that you are using an official GOMO channel before entering personal information.
How to Log In to Your GOMO Account
GOMO also provides an online account system for managing your services.
According to the provided source material, the GOMO login system allows users to enter their GOMO number and 6-digit PIN.

Step 1: Open the Official GOMO Website
Go to the official GOMO Philippines website:
Using the official website is particularly important when accessing an account because you may be entering your mobile number and PIN.
Step 2: Select Log In
Look for the Log in option on the official GOMO website.
Step 3: Enter Your GOMO Number
Enter the GOMO number associated with your account.
Check the number before continuing.
Step 4: Enter Your 6-Digit PIN
Enter your registered 6-digit PIN.
Do not share your PIN with another person.
Step 5: Access Your Account
Continue to sign in and access the available account features.
If you cannot remember your PIN, the official login page provides a Forgot PIN? option that can be used to begin the recovery process.
GOMO PH App
The GOMO PH app is another way users can manage their GOMO services.
The provided information states that the GOMO PH app is available for both iOS and Android.
Depending on the current services available, the GOMO ecosystem can provide access to features such as:
- Data offers
- Roaming offers
- Account management
- ‘Mo Creds
- Other GOMO services
The app can be particularly useful for people who want to manage their GOMO eSIM and related services from a smartphone rather than relying entirely on a browser.
How to Use the GOMO PH App
A general approach is:
- Download the official GOMO PH app from the appropriate official app store.
- Open the application.
- Sign in using your GOMO account information.
- Review the services available to your account.
- Check your current offers and data options.
- Follow the app instructions for any purchase or account-management action.
The exact screens can change as GOMO updates its application, so use the current instructions displayed inside the official app.
How to Check GOMO Data Offers
Before purchasing a GOMO eSIM or another GOMO data package, it is useful to check the currently available offers.
GOMO’s available packages can change over time, including their data allocation, validity, price, and eligibility.
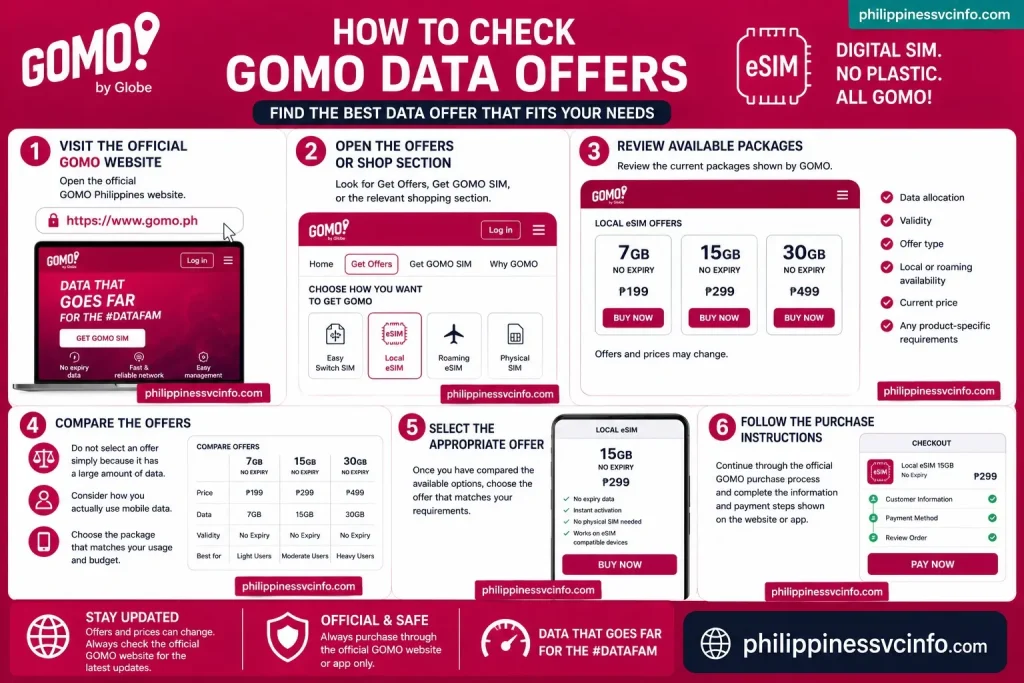
Step 1: Visit the Official GOMO Website
Open:
Step 2: Open the Offers or Shop Section
Look for Get Offers, Get GOMO SIM, or the relevant shopping section.
Step 3: Review Available Packages
Review the current packages shown by GOMO.
Pay attention to:
- Data allocation
- Validity
- Offer type
- Local or roaming availability
- Current price
- Any product-specific requirements
Step 4: Compare the Offers
Do not select an offer simply because it has a large amount of data.
Consider how you actually use mobile data. Someone who mainly uses messaging and occasional browsing may need a different package from someone who regularly streams video or uses mobile data for work.
Step 5: Select the Appropriate Offer
Once you have compared the available options, choose the offer that matches your requirements.
Step 6: Follow the Purchase Instructions
Continue through the official GOMO purchase process and complete the information and payment steps shown on the website or app.
GOMO eSIM for Foreign Residents and Visitors
Foreign residents and visitors considering a GOMO eSIM should check the current eligibility, identification, registration, and purchase requirements before ordering.
The provided source specifically advises users not to assume that every GOMO eSIM product has identical requirements.
This is especially important because GOMO offers different product categories.
A visitor should first determine whether they need:
- A local Philippine GOMO eSIM
- A roaming or travel eSIM
- Another available GOMO SIM product
Before purchasing, check the product information provided by GOMO and confirm that the offer is suitable for your situation.
GOMO Local eSIM vs Roaming eSIM
One of the most important distinctions when shopping for a GOMO eSIM is the difference between local and roaming products.
GOMO separately lists Local eSIM and Roaming eSIM products.
| Feature | Local GOMO eSIM | GOMO Roaming eSIM |
|---|---|---|
| Main purpose | Local GOMO service | International/travel use |
| Product category | Local eSIM | Roaming/Travel eSIM |
| Intended use | Philippine service | Eligible international destinations |
| Selection | Check local offers | Check destination-specific offers |
| Availability | Can change | Can change |
Local GOMO eSIM
A Local eSIM is intended for GOMO’s local service.
If you need a standard Philippine GOMO connection, check the Local eSIM category before purchasing.
GOMO Roaming eSIM
A Roaming eSIM is intended for eligible international roaming or travel use.
GOMO’s roaming information can vary according to the destination, so users should check the available destination-specific offers before purchasing.
Why the Difference Matters
Both products are digital SIM products, but their purposes can be different.
Therefore, simply searching for a GOMO eSIM is not enough. Before completing payment, confirm that you have selected the correct product category.
GOMO Roaming eSIM
GOMO also provides Travel eSIM / GOMO Roam products for international use.
The source information states that the official roaming page provides country-specific information and allows users to select a destination to review available roaming offers.
If you are traveling outside the Philippines, check the destination before purchasing.
A good approach is to:
- Open the official GOMO website.
- Find the roaming or travel section.
- Select your destination if the option is provided.
- Review the available roaming offer.
- Check the data allocation and applicable validity.
- Confirm that your phone supports the required eSIM functionality.
- Follow the official activation instructions.
Do not assume that a local GOMO eSIM and a roaming eSIM are interchangeable.
GOMO eSIM Troubleshooting: First Checks
If your newly installed GOMO eSIM is not working, avoid immediately deleting the eSIM profile.
Start with basic checks.
Check 1: eSIM Compatibility
Confirm that your phone supports eSIM.
If the device does not support eSIM technology, the GOMO eSIM cannot be installed in the normal digital-SIM manner.
Check 2: Restart Your Phone
Restart the device after installation.
A restart can sometimes allow the newly installed mobile profile to connect correctly.
Check 3: Check the GOMO eSIM Line
Open your phone’s SIM or mobile-network settings.
Make sure the GOMO eSIM is enabled.
Check 4: Check Mobile Data
Confirm that mobile data is turned on.
If your phone contains multiple SIMs, make sure the GOMO line is selected for mobile data.
Check 5: Check APN Settings
For relevant roaming scenarios, the provided GOMO information identifies the APN as gomo.ph.
If your device displays an APN selection, follow GOMO’s current instructions rather than changing settings unnecessarily.
Check 6: Check Network Coverage
If the GOMO eSIM is enabled but the internet remains unavailable, check your network reception.
Try moving to an area with stronger signal and test the connection again.
Check 7: Check Your Data Offer
Make sure the relevant GOMO data allocation or service is active.
An installed GOMO eSIM does not automatically mean that every data service is currently available.
Check 8: Contact Official GOMO Support
If the problem continues after these checks, use GOMO’s official support channels rather than relying on unofficial troubleshooting websites.
GOMO eSIM Not Working: Complete Troubleshooting Guide
If your GOMO eSIM has been installed but mobile data is not working, do not immediately delete the eSIM profile. Work through the basic checks first. The exact solution can depend on your device, the GOMO product you purchased, network conditions, and whether you are using a local or roaming service.
1. Confirm That Your Phone Supports eSIM
First, make sure your smartphone supports eSIM functionality.
If the device does not support eSIM, the GOMO digital SIM profile cannot be installed normally. If you are unsure, check your phone manufacturer’s specifications or the eSIM option in your device’s SIM settings.
2. Restart Your Phone
Restart your smartphone after installing the GOMO eSIM.
A restart can help the device recognize the newly installed mobile profile and reconnect to the available network.
3. Make Sure the GOMO eSIM Is Enabled
Open your phone’s SIM or mobile-network settings.
Check that the GOMO eSIM is switched on. If you have another SIM installed, make sure you have identified the correct line.
4. Check Your Mobile Data Settings
Confirm that mobile data is enabled.
On a dual-SIM phone, also check which SIM is selected for mobile data. If another SIM is selected as the default data line, your phone may not use the GOMO connection for internet access.
5. Review APN Settings
APN settings can affect mobile-data connectivity.
The provided GOMO information identifies gomo.ph as the APN in relevant roaming scenarios.
Do not change APN settings randomly. If GOMO provides product-specific instructions, follow those instructions for your particular service.
6. Check Your Network Signal
Look at the signal indicator on your phone.
If reception is weak, move to an area with better coverage and test the GOMO eSIM again.
Poor signal conditions can affect internet performance even when the eSIM itself has been installed correctly.
7. Check Your Data Offer
An installed GOMO eSIM does not necessarily mean that an active data allocation is available.
Check your current GOMO account or app to confirm that the relevant data offer or service is active.
8. Check Whether You Purchased the Correct Product
GOMO separately lists local and roaming eSIM products.
If you intended to purchase a local GOMO eSIM but selected a roaming product, or vice versa, the service may not match your intended use.
Review your purchase confirmation and product information.
9. Contact GOMO Support
If the basic checks do not solve the problem, use GOMO’s official support channels.
Avoid relying on unofficial websites that ask for your GOMO PIN, OTP, or other sensitive information.
Common GOMO eSIM Problems and Solutions
| Problem | What to Check |
|---|---|
| GOMO eSIM cannot be installed | Check device compatibility and the official installation instructions |
| GOMO eSIM is not detected | Confirm that the eSIM profile was installed correctly |
| No mobile data | Check mobile data, the selected SIM, signal, and applicable APN |
| Internet is slow | Check signal strength, network conditions, and your data allocation |
| GOMO eSIM cannot activate | Follow the product-specific activation instructions |
| Forgot GOMO PIN | Use the official Forgot PIN? option |
| Roaming does not work | Check the roaming offer, APN, and applicable data-roaming settings |
| GOMO offer is unavailable | Check the current GOMO shop and product availability |
| Unsure which eSIM to buy | Compare Local eSIM and Roaming eSIM categories |
The source material specifically recommends checking device compatibility, SIM settings, mobile data, APN information, network coverage, active offers, and official support when troubleshooting.
GOMO eSIM Safety Tips
Because a GOMO eSIM purchase or registration can involve personal and payment information, security should be part of the setup process.
Use the Official GOMO Website
Start from the official GOMO Philippines website:
Avoid websites that imitate GOMO or offer suspiciously cheap SIM products.
Download the Official App
If you want to use the GOMO PH app, obtain it through an official app-store listing rather than downloading an unknown APK or application file.
Never Share Your OTP
Never give your GOMO OTP or authentication code to another person.
An OTP is intended to verify your own transaction or account activity.
Protect Your PIN
Your GOMO account PIN should remain private.
If somebody asks for your PIN while claiming to provide support, verify the request through an official GOMO channel first.
Check the Website Address
Before entering personal information, check that you are using the official GOMO website.
The official website provided in the source material is:
Save Your Transaction Details
After purchasing a GOMO eSIM, keep your confirmation or transaction information.
These details may be useful if you later need to verify the purchase or contact official support.
Do Not Delete the eSIM Without a Plan
Avoid deleting an installed GOMO eSIM unless you know that it can be reinstalled or you have a replacement procedure available.
The source material specifically warns users not to delete an installed eSIM without understanding the consequences.
How to Recover a Forgotten GOMO PIN
If you cannot remember your GOMO account PIN, use the official account-login process rather than trying random PIN combinations repeatedly.
The provided information states that the GOMO login page includes a Forgot PIN? option.
General Steps
- Open the official GOMO website.
- Select Log in.
- Enter your GOMO number when requested.
- Select Forgot PIN?.
- Follow the verification or recovery instructions shown by GOMO.
- Complete the recovery process.
- Create or confirm the required account credentials.
- Keep your new PIN private.
If the recovery process does not work, use GOMO’s official support options
Can You Switch From a Physical SIM to GOMO eSIM?
GOMO lists Easy Switch SIM, Local eSIM, and Physical SIM as separate product categories.
Therefore, users should not assume that switching from a physical SIM to an eSIM always follows the same process as purchasing a new eSIM.
If you want to switch an existing service, first check the current GOMO product options and instructions.
Before changing SIM types, make sure you understand whether you are:
- Purchasing a new number
- Switching an existing service
- Replacing a physical SIM
- Moving to an eSIM-compatible device
- Using a local or roaming product
If your existing GOMO number is important, do not delete the existing SIM or eSIM until you understand the official switching procedure.
GOMO eSIM vs Physical SIM: Which Should You Choose?
Both options can provide GOMO mobile connectivity, but they work differently.
A GOMO eSIM is installed digitally and requires a compatible eSIM-enabled device. A physical GOMO SIM uses a removable plastic SIM card.
Choose GOMO eSIM If:
- Your phone supports eSIM.
- You prefer digital installation.
- You want to avoid inserting a physical SIM.
- Your device supports multiple SIM profiles and you want to use that functionality.
- The available GOMO eSIM offer matches your requirements.
Consider a Physical SIM If:
- Your phone does not support eSIM.
- You prefer a removable SIM card.
- You regularly move the SIM between compatible devices.
- A suitable physical GOMO SIM is easier for your situation.
The better choice depends on your phone and intended use rather than simply choosing the newer technology.
Frequently Asked Questions About GOMO eSIM
Final Thoughts on GOMO eSIM
A GOMO eSIM offers a convenient digital alternative to a physical SIM on compatible devices, allowing users to choose the right GOMO offer, complete the purchase, install the eSIM, configure the mobile line, and test the connection without inserting a plastic SIM card. GOMO currently separates Local eSIM, Roaming eSIM, Easy Switch SIM, and Physical SIM options, so users should select the product that matches their needs. Because GOMO offers, prices, availability, and procedures can change, it is best to verify the latest details through the official GOMO website or GOMO PH app before purchasing or activating a GOMO eSIM.
Discover What You Need to Know:
- DITO SIM Registration Number 2026: Check Your Number, Registration Status & Reference Number
- GOMO Unli Data Promos: Price, Validity, Registration & How to Avail 2026
- Globe Postpaid Guide: Plans, Requirements, Application, Billing & GlobeOne 2026
- DITO App: Complete Guide to Download, Login, Load, Promos & Account Management
- DITO eSIM Philippines: Complete Registration & Activation Guide 2026
- SIM: Complete Guide to SIM Cards, eSIM, Types, Activation & Registration 2026