TNT (Talk ‘N Text) is one of the most trusted prepaid mobile networks in the Philippines, offering affordable calls, text messaging, mobile data, and value-packed promos for millions of subscribers. Operated by Smart Communications, TNT is known for its reliable nationwide coverage and budget-friendly mobile services, making it a popular choice among students, workers, and families. Whether you’re a new subscriber or an existing user, understanding TNT SIM registration, activation, and requirements is essential to keep your SIM active and enjoy uninterrupted access to all TNT services.
What Is TNT SIM Registration?
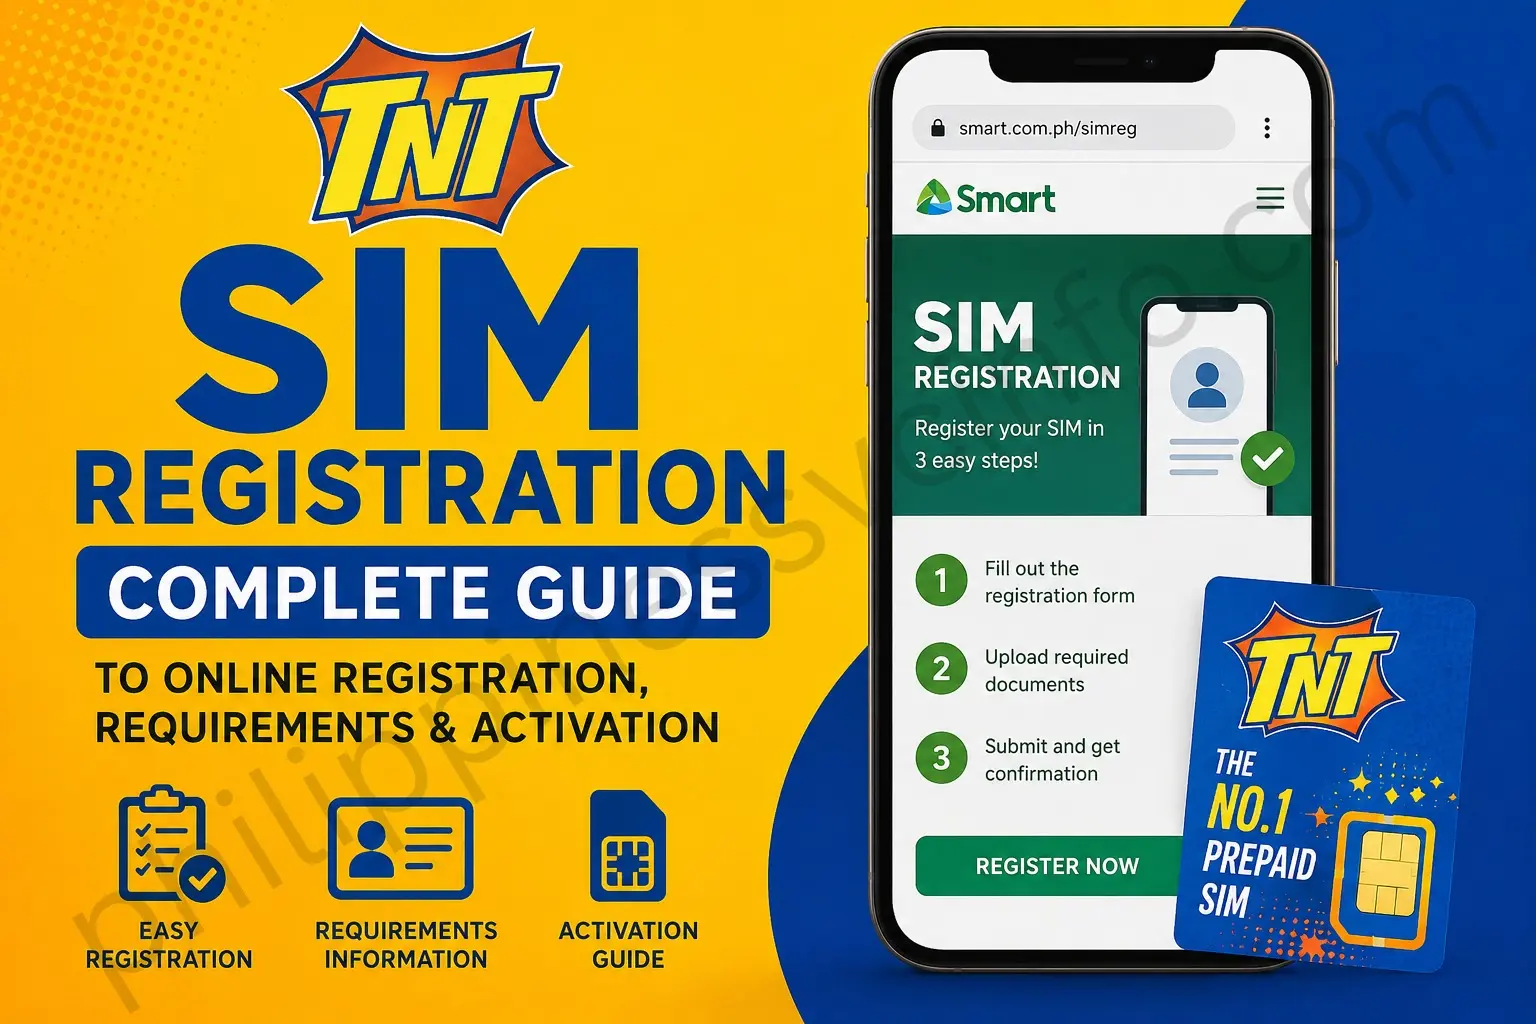
TNT (Talk ‘N Text) is one of the Philippines’ leading mobile networks, offering affordable prepaid services and reliable nationwide coverage. TNT SIM cards are widely available through authorised retailers, shopping malls, convenience stores, and online marketplaces. Before using your TNT SIM for calls, text messages, or mobile data, you must complete the SIM registration process by providing the required personal information and valid identification documents in accordance with Philippine telecommunications regulations. Registering your TNT SIM ensures legal compliance, activates your mobile services, and allows you to enjoy uninterrupted access to the TNT network.

Why Is TNT SIM Registration Important?
Registering your TNT SIM card is more than just a legal requirement—it also helps protect your mobile account and ensures uninterrupted access to TNT services. Below are the main reasons why every subscriber should complete the registration process.
Enhanced Security
SIM registration links your mobile number to your verified identity, making it easier for authorities to investigate fraudulent activities and other crimes involving mobile numbers. This added layer of accountability also helps reduce the misuse of unregistered SIM cards.
Compliance with Philippine Regulations
Under Philippine law, all TNT subscribers are required to register their SIM cards. The regulation was introduced to combat scams, spam messages, identity theft, and other mobile-related criminal activities by ensuring that every active SIM card is associated with a legitimate user.
Continued Access to TNT Services
A TNT SIM card must be registered before it can be fully activated. Without successful registration, you may be unable to make calls, send text messages, use mobile data, or enjoy other network services. Registering your SIM ensures uninterrupted access to all TNT mobile features.
How to Register Your TNT SIM Card
Registering your TNT SIM card is a straightforward process, provided you have a valid government-issued ID and the required personal information. Completing your registration ensures your SIM remains active and allows you to continue enjoying calls, text messages, mobile data, and other TNT services while staying connected with family and friends.
You can register your TNT SIM using any of the following methods:
TNT SIM Registration Through the Online Portal
Registering your TNT SIM through the official online portal is the quickest and most convenient way to activate your SIM card without visiting a Smart or TNT store. As long as you have a stable internet connection, a valid government-issued ID, and your mobile phone, you can complete the registration process in just a few minutes.

Follow the steps below to register your TNT SIM online successfully.
Step 1: Open the TNT SIM Registration Portal
Visit the official TNT SIM Registration portal by clicking the registration button or opening the official registration link in your web browser.
Step 2: Scan the QR Code (Optional)
If a QR code is available, simply scan it with your smartphone to be redirected directly to the TNT SIM registration page.
Step 3: Enter Your Mobile Number
Type your TNT mobile number beginning with 9.
Example: 917XXXXXXXX
Do not include 0 or +63 when entering your number.
Step 4: Accept the Terms and Conditions
Read the Terms and Conditions carefully, then tick the confirmation box to indicate your agreement before continuing.
Step 5: Request a One-Time Password (OTP)
Click the Send OTP button. A verification code will be sent to your TNT mobile number.
Step 6: Verify the OTP
Wait for the OTP to arrive via SMS. If you do not receive it within two minutes, select Resend OTP to request another code.
Enter the OTP in the required field and click Verify OTP.
Important:
Each OTP is valid for only 2 minutes, so enter it before it expires.
Step 7: Continue After Verification
Once your mobile number has been verified successfully, click OK to proceed to the registration form.
Step 8: Complete the Customer Information Form
Fill in all the required personal information requested on the registration page.
Step 9: Select Your Registration Type
Choose the appropriate registration option, whether you are registering a new TNT SIM or an existing active SIM.
Step 10: Choose Your Nationality
Select your nationality from the available list.
For Filipino subscribers, choose Philippines before moving to the next step.
Step 11: Upload a Valid Government ID
Upload clear images of both the front and back of your valid government-issued identification card.
Make sure the ID is readable, unexpired, and all information is clearly visible to avoid verification issues.
Step 12: Complete the Selfie Verification
Follow the instructions to capture a live selfie.
For successful verification, ensure your face is clearly visible, the lighting is good, and your appearance matches the photo on your ID.
Step 13: Confirm ID Verification
After your identity has been verified successfully, click OK to continue.
Step 14: Provide Your Personal Information
Enter the required details, including:
- First Name
- Last Name
- Age
- Date of Birth
- Gender
- Contact Number
- Residential Address
In some cases, the system may automatically populate certain fields based on your uploaded ID.
Step 15: Add an Alternate Contact (Optional)
If you’d like, you can provide an alternative contact number or email address. This step is optional.
Click Next to continue.
Step 16: Review and Submit Your Registration
Carefully review all the information you have entered to ensure it is accurate.
Tick the confirmation checkbox and click Submit to complete your registration.
Step 17: Registration Confirmation
Once your application has been processed successfully, a confirmation message will appear indicating that your TNT SIM has been successfully registered.
Note:
The registration process for TM SIM is very similar. After completing your personal information, ID verification, and selfie authentication, you will receive a confirmation message once your TM SIM registration has been approved.
Register Your TNT SIM Using the Smart App
The official Smart App provides a fast and convenient way to register your TNT SIM card directly from your smartphone. Before you begin, ensure your TNT SIM is inserted into your device, you have a stable internet connection, and a valid government-issued ID is ready for verification.
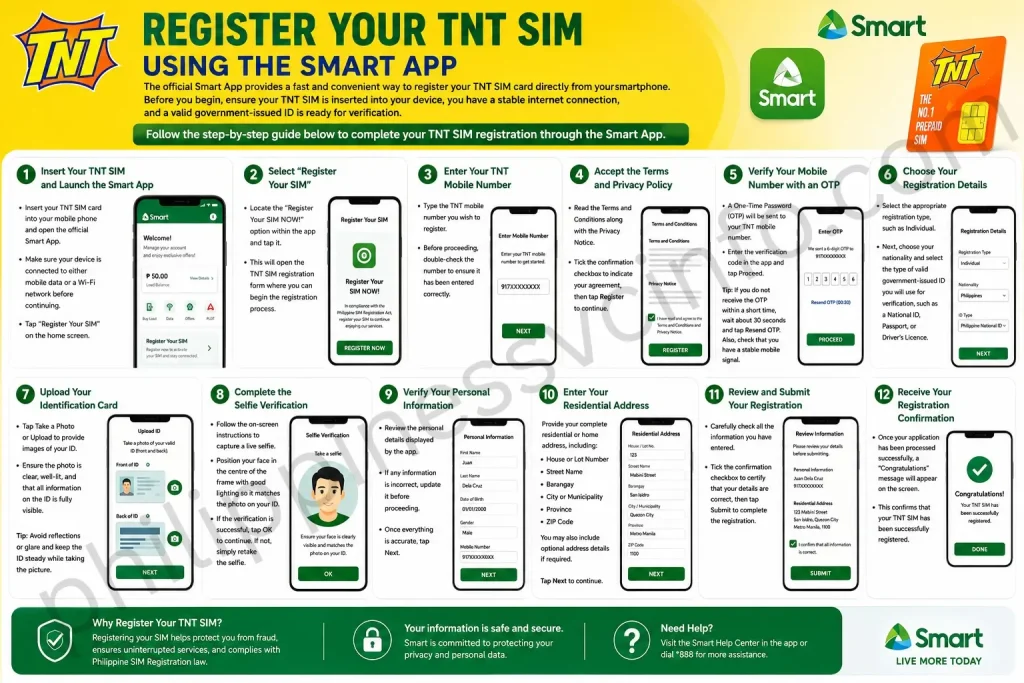
Follow the step-by-step guide below to complete your TNT SIM registration through the Smart App.
Step 1: Insert Your TNT SIM and Launch the Smart App
Insert your TNT SIM card into your mobile phone and open the official Smart App.
Make sure your device is connected to either mobile data or a Wi-Fi network before continuing.
Tap “Register Your SIM” on the home screen.
Step 2: Select “Register Your SIM”
Locate the “Register Your SIM NOW!” option within the app and tap it.
This will open the TNT SIM registration form where you can begin the registration process.
Step 3: Enter Your TNT Mobile Number
Type the TNT mobile number you wish to register.
Before proceeding, double-check the number to ensure it has been entered correctly.
Step 4: Accept the Terms and Privacy Policy
Read the Terms and Conditions along with the Privacy Notice.
Tick the confirmation checkbox to indicate your agreement, then tap Register to continue.
Step 5: Verify Your Mobile Number with an OTP
A One-Time Password (OTP) will be sent to your TNT mobile number.
Enter the verification code in the app and tap Proceed.
Tip:
If you do not receive the OTP within a short time, wait about 30 seconds and tap Resend OTP. Also, check that you have a stable mobile signal.
Step 6: Choose Your Registration Details
Select the appropriate registration type, such as Individual.
Next, choose your nationality and select the type of valid government-issued ID you will use for verification, such as a National ID, Passport, or Driver’s Licence.
Step 7: Upload Your Identification Card
Tap Take a Photo or Upload to provide images of your ID.
Ensure the photo is clear, well-lit, and that all information on the ID is fully visible.
Tip:
Avoid reflections or glare and keep the ID steady while taking the picture.
Step 8: Complete the Selfie Verification
Follow the on-screen instructions to capture a live selfie.
Position your face in the centre of the frame with good lighting so it matches the photo on your ID.
If the verification is successful, tap OK to continue. If not, simply retake the selfie.
Step 9: Verify Your Personal Information
Review the personal details displayed by the app.
If any information is incorrect, update it before proceeding.
Once everything is accurate, tap Next.
Step 10: Enter Your Residential Address
Provide your complete residential or home address, including:
- House or Lot Number
- Street Name
- Barangay
- City or Municipality
- Province
- ZIP Code
You may also include optional address details if required.
Step 11: Review and Submit Your Registration
Carefully check all the information you have entered.
Tick the confirmation checkbox to certify that your details are correct, then tap Submit to complete the registration.
Step 12: Receive Your Registration Confirmation
Once your application has been processed successfully, a “Congratulations” message will appear on the screen.
This confirms that your TNT SIM has been successfully registered, allowing you to continue using calls, text messaging, mobile data, and other Smart network services without interruption.
Offline TNT SIM Registration Method
If you would rather register your TNT SIM card in person, you can visit an authorised Smart Store or service centre for assistance. This option is ideal for subscribers who need help completing the registration process or prefer face-to-face support.
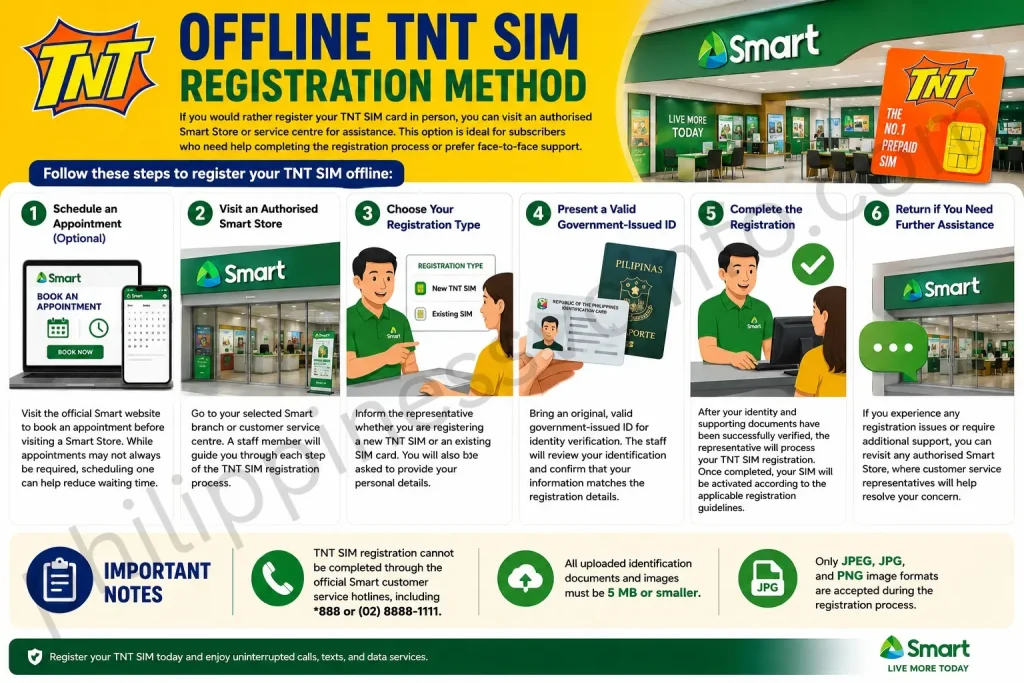
Follow these steps to register your TNT SIM offline:
Step 1: Schedule an Appointment (Optional)
Visit the official Smart website to book an appointment before visiting a Smart Store. While appointments may not always be required, scheduling one can help reduce waiting time.
Step 2: Visit an Authorised Smart Store
Go to your selected Smart branch or customer service centre. A staff member will guide you through each step of the TNT SIM registration process.
Step 3: Choose Your Registration Type
Inform the representative whether you are registering a new TNT SIM or an existing SIM card. You will also be asked to provide your personal details.
Step 4: Present a Valid Government-Issued ID
Bring an original, valid government-issued ID for identity verification. The staff will review your identification and confirm that your information matches the registration details.
Step 5: Complete the Registration
After your identity and supporting documents have been successfully verified, the representative will process your TNT SIM registration. Once completed, your SIM will be activated according to the applicable registration guidelines.
Step 6: Return if You Need Further Assistance
If you experience any registration issues or require additional support, you can revisit any authorised Smart Store, where customer service representatives will help resolve your concern.
Important Notes
- TNT SIM registration cannot be completed through the official Smart customer service hotlines, including *888 or (02) 8888-1111.
- All uploaded identification documents and images must be 5 MB or smaller.
- Only JPEG, JPG, and PNG image formats are accepted during the registration process.
TNT SIM Registration for International Visitors and Tourists
Foreign travellers visiting the Philippines can also register a TNT SIM card to access local mobile services during their stay. The registration procedure is largely the same as that for Filipino subscribers, although international visitors must provide additional travel and identification documents to verify their identity.

Follow these steps to register your TNT SIM as a foreign visitor:
Step 1: Open the Official TNT SIM Registration Portal
Go to the official TNT SIM registration website to begin your application.
Step 2: Verify Your Mobile Number
Enter your TNT mobile number and request a One-Time Password (OTP).
Once the verification code is received, enter it in the required field to confirm your mobile number.
Step 3: Provide Your Personal Information
Complete the registration form by entering the required details, including your:
- Passport Number
- Valid Visa Information
- Nationality
- Other personal information requested during registration
Step 4: Upload Your Supporting Documents
Upload clear images of your passport and valid visa in the designated section.
Ensure that all files are in JPEG, JPG, or PNG format and that the images are clear, readable, and meet the upload requirements.
Step 5: Complete the Face Verification
Follow the on-screen instructions to take a live selfie.
For successful verification, make sure your face is clearly visible, well-lit, and matches the photograph in your passport.
Step 6: Submit Your Registration
Review all the information you have entered before submitting your application.
After submission, Smart will verify your documents and identity. The approval process may take a few days, after which you will receive confirmation that your TNT SIM registration has been completed successfully.
TNT SIM Registration for Government Agencies and Private Organisations
Government offices, private companies, and other organisations can also register TNT SIM cards under their entity’s name. While the registration process is generally similar to that for individual subscribers, organisations must submit additional documents to verify their legal identity and authorise the person completing the registration.
Required Documents for Government Agencies
If the SIM card is being registered on behalf of a government office or agency, prepare the following documents:
- Valid government-issued ID of the authorised representative
- Authorisation Letter or Special Power of Attorney (SPA) signed by the head of the government office
- Official ID of the department head or authorised signatory
- Certificate of Employment or Designation confirming the representative’s official position
Required Documents for Private Companies and Corporations
Private entities and registered businesses must provide supporting documents to confirm their legal status and authorisation. These typically include:
- Certificate of Registration issued by the Securities and Exchange Commission (SEC)
- Board Resolution or Secretary’s Certificate appointing the authorised representative
- Valid government-issued ID of the authorised representative
- Valid ID of the company’s authorised signatory or approving officer
- Business Permit or DTI Certificate for businesses that are not registered with the SEC
Important Note:
The authorised representative is responsible for registering, managing, and maintaining all TNT SIM cards issued under the name of the government agency, company, or organisation. Ensure that all submitted documents are valid, complete, and up to date to avoid delays during the verification process.
TNT SIM Registration Requirements and Accepted IDs
Before registering your TNT SIM card, whether through the online registration portal or at an authorised Smart Store, make sure you have all the required information and identification documents ready. Providing complete and accurate details helps ensure that your registration is processed without unnecessary delays.
TNT SIM Registration Requirements for Philippine Citizens
Filipino subscribers should prepare the following information before starting the registration process:
- TNT mobile number
- Full name
- Date of birth
- Gender
- Complete residential address
- Valid, non-expired government-issued ID
- Clear selfie or recent photograph for identity verification
- SIM purchase slip (if available)
- Email address (optional)
Acceptable Government-Issued IDs
The following valid IDs are commonly accepted for TNT SIM registration:
- Philippine National ID (PhilSys)
- Social Security System (SSS) ID
- UMID or SSS E-Card
- Passport
- Driver’s Licence
- Police Clearance
- National Bureau of Investigation (NBI) Clearance
- Professional Regulation Commission (PRC) ID
- Integrated Bar of the Philippines (IBP) ID
- Voter’s ID
- OWWA ID
- Senior Citizen Card (SCC)
Important:
All identification documents must be valid, unexpired, clear, and readable. Blurred, damaged, or expired IDs may result in your TNT SIM registration being delayed or rejected.
How to Check Your TNT SIM Registration Status
After completing your TNT SIM registration, it’s a good idea to verify that your registration has been successfully processed. You can easily check your registration status using either the Smart App or the Smart SIM Registration Portal.

Method 1: Check Through the Smart App
The Smart App provides a quick and convenient way to confirm whether your TNT SIM has been successfully registered.
Follow these steps:
- Open the Smart App on your mobile device.
- Sign in to your account or create one if you haven’t registered yet.
- Once you’re logged in, navigate to your account dashboard.
- Your TNT SIM registration status will be displayed, indicating whether your SIM is Registered or Not Registered.
This is the fastest method if you already use the Smart App to manage your TNT account.
Method 2: Check Through the Smart SIM Registration Portal
You can also verify your registration directly through the official Smart SIM Registration Portal.
Follow these steps:
- Open the official Smart SIM Registration Portal using the registration link or button provided.
- Enter your TNT mobile number in the designated field.
- Submit your number for verification.
The system will display one of the following results:
- If your SIM has already been registered, you will see a confirmation message stating: “Your number is already registered.”
- If your SIM has not yet been registered, you will be redirected to the SIM registration page so you can complete the registration process.
Tip:
If the portal indicates that your SIM is not registered even though you have already submitted your application, wait for the verification process to finish and check again later, as registration approval may take some time.
Benefits of TNT SIM Registration
Registering your TNT SIM card offers more than just legal compliance. It also improves your account security, ensures uninterrupted mobile services, and gives you access to reliable customer support. Below are some of the key advantages of completing your TNT SIM registration.
Safer Telecommunications Environment
SIM registration contributes to a more secure mobile network by reducing the use of unregistered SIM cards for illegal activities. This creates a safer telecommunications environment for all subscribers while helping telecom providers maintain the integrity of their services.
Reliable Customer Support
Registered subscribers can receive faster and more efficient assistance from TNT and Smart customer service. Since your account details are linked to your verified identity, resolving SIM-related concerns, account verification, or service requests becomes much easier.
Reduced Risk of SIM Deactivation
Unregistered SIM cards may be deactivated in accordance with Philippine SIM registration regulations. By completing your registration on time, you can continue using your mobile number without worrying about losing access to your calls, messages, mobile data, or other TNT services.
Common TNT SIM Registration Errors and Their Solutions
Although the TNT SIM registration process is usually straightforward, some users may encounter errors that prevent them from completing their registration successfully. Below are the most common issues and practical solutions to help you finish your registration without delays.
1. OTP Not Received
Possible Causes:
- Weak mobile signal
- Network congestion
- Incorrect mobile number entered
Solution:
- Make sure your phone has a strong network signal.
- Verify that you entered the correct TNT mobile number.
- Wait for a few minutes, then tap Resend OTP if the code does not arrive.
- Restart your phone if the issue continues.
2. Invalid or Expired OTP
Possible Causes:
- The OTP has expired.
- An incorrect verification code was entered.
Solution:
- Request a new OTP.
- Enter the latest OTP immediately, as it is only valid for a limited time.
- Avoid using previously received OTPs.
3. Unable to Upload ID
Possible Causes:
- Unsupported file format
- File size exceeds the allowed limit
- Blurry or damaged image
Solution:
- Upload your ID in JPEG, JPG, or PNG format.
- Ensure the file size does not exceed 5 MB.
- Take a clear, well-lit photo with all details visible.
4. Selfie Verification Failed
Possible Causes:
- Poor lighting
- Face not fully visible
- Selfie does not match the ID photo
Solution:
- Take the selfie in a bright location.
- Remove sunglasses, hats, or face coverings.
- Position your face in the centre of the camera and follow the on-screen instructions.
5. Invalid or Expired ID
Possible Causes:
- Expired government-issued ID
- Unsupported identification document
Solution:
- Use a valid, non-expired government-issued ID.
- Ensure the ID type is included in the list of accepted identification documents.
6. “Number Already Registered” Error
Possible Causes:
- The SIM has already been registered.
Solution:
- Check your registration status using the Smart App or the official SIM Registration Portal.
- If you believe the message is incorrect, contact Smart Customer Support for assistance.
7. Registration Page Not Loading
Possible Causes:
- Slow internet connection
- Temporary website maintenance
- Browser issues
Solution:
- Refresh the page after a few minutes.
- Switch to another browser or clear your browser cache.
- Connect to a stable Wi-Fi or mobile data network.
8. Registration Submission Failed
Possible Causes:
- Missing required information
- Temporary server issue
- Unstable internet connection
Solution:
- Review all fields and complete any missing information.
- Check your internet connection and submit the form again.
- Try registering later if the portal is temporarily busy.
9. Personal Information Does Not Match ID
Possible Causes:
- Typographical errors
- Information entered does not match the uploaded ID
Solution:
- Enter your name, date of birth, and other personal details exactly as they appear on your government-issued ID.
- Double-check all information before submitting the registration.
10. SIM Remains Inactive After Registration
Possible Causes:
- Registration is still under review.
- Verification has not yet been completed.
Solution:
- Wait for the confirmation SMS or email from Smart.
- Check your registration status through the Smart App or SIM Registration Portal.
- If your SIM remains inactive after a reasonable period, contact Smart Customer Support or visit the nearest Smart Store.
Helpful Tip:
Before starting your TNT SIM registration, prepare a valid ID, ensure you have a stable internet connection, and carefully review all information before submitting the application. This helps minimise errors and speeds up the verification process.
Frequently Asked Questions (FAQs)
Final Words
TNT SIM registration is an essential requirement for keeping your mobile number active and ensuring uninterrupted access to calls, text messages, mobile data, and other TNT services. It also strengthens user security by helping prevent scams, identity theft, and the misuse of unregistered SIM cards, making the mobile network safer for everyone.
Whether you are a Filipino resident, a foreign visitor, or registering a SIM on behalf of an organisation, completing the registration process with accurate information and valid documents is important. Registering your TNT SIM on time helps you comply with Philippine regulations while allowing you to continue enjoying reliable and secure mobile communication without interruption.
Discover What You Need to Know:
- TM SIM Registration 2026: Complete Guide to Register, Activate & Update Your SIM
- DITO SIM Registration 2026: Official Registration Link, Requirements & Guide
- Smart SIM Registration Guide 2026: Register, Verify & Activate Your SIM
- Globe SIM Registration 2026: Complete Online Registration Guide
- SIM Registration 2026: Complete Guide for Smart, Globe & DITO