
If you need an NBI Clearance for employment, travel, government transactions, or another legitimate purpose, the application begins online through the official NBI Clearance portal. The online system allows applicants to create an account, enter their personal information, choose a clearance branch and appointment, and arrange payment before visiting the selected NBI office.
What Is NBI Online Registration?
NBI online registration is the first stage of applying for an NBI Clearance through the internet. Instead of completing the entire process at an NBI office, applicants can create their account and provide much of the required information online before appearing at their selected branch.
The online process is designed to reduce unnecessary waiting and organise the applicant’s transaction before the branch visit. The NBI currently directs applicants to its official NBI Clearance Application Portal for online registration and application.
The basic online process can be viewed as:
Register → Complete Profile → Apply for Clearance → Select Branch → Choose Schedule → Pay → Visit NBI Branch → Biometrics/Verification → Release
The exact requirements and available options can depend on the type of application and the applicant’s circumstances.
Official Websites for NBI Online Registration
Use these official sources when beginning your application:
| Purpose | Official Website |
|---|---|
| NBI Clearance Online Registration | clearance.nbi.gov.ph |
| National Bureau of Investigation | nbi.gov.ph |
| NBI Clearance Office Locator | Find an NBI Clearance Office |
| NBI Clearance Information | Official NBI Clearance information |
The NBI’s office locator specifically advises applicants to apply and pay online through the Official Online NBI Clearance Portal before going to an NBI clearance office.
NBI Online Registration Requirements
Before beginning NBI online registration, prepare the information you are likely to need. Having your details available can make account creation and the application form easier to complete.
Basic Information to Prepare
You should have:
- An active mobile number
- A working email address
- Accurate personal information
- Family background information
- Education details
- Employment information, where applicable
- A valid government-issued ID for your branch appointment
- Payment for the applicable clearance fee and service charges
The NBI’s current online instructions state that registration uses an active mobile number and email address, with an OTP used to verify registration. Applicants must also complete personal, family, education and employment information in their profile.
Valid ID
Choose the valid government-issued ID that you intend to present at the NBI branch. The NBI online application process asks applicants to select the valid government ID they plan to bring when applying for clearance.
Tip: Make sure the information you enter online agrees with your identification documents. Differences in spelling, names or other personal details can create problems during verification.
How to Create an NBI Clearance Account
Creating an account is the starting point for most applicants using the online NBI Clearance system.
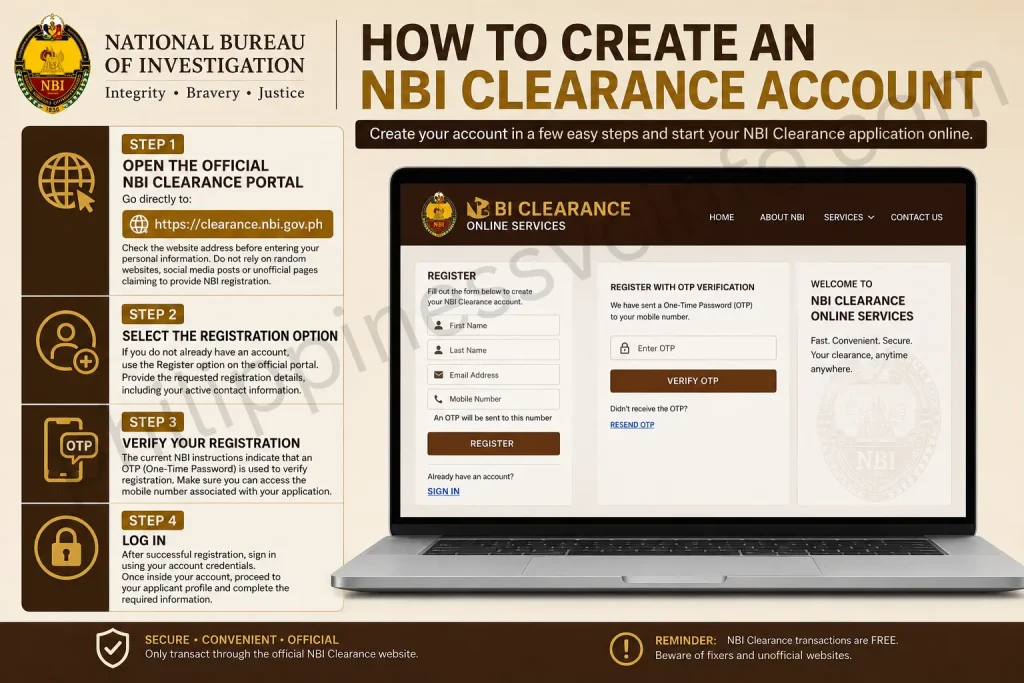
Step 1: Open the Official NBI Clearance Portal
Go directly to:
Check the website address before entering your personal information. Do not rely on random websites, social media posts or unofficial pages claiming to provide NBI registration.
Step 2: Select the Registration Option
If you do not already have an account, use the Register option on the official portal.
Provide the requested registration details, including your active contact information.
Step 3: Verify Your Registration
The current NBI instructions indicate that an OTP (One-Time Password) is used to verify registration. Make sure you can access the mobile number associated with your application.
Step 4: Log In
After successful registration, sign in using your account credentials.
Once inside your account, proceed to your applicant profile and complete the required information.
Completing Your Personal Information
Accurate NBI personal information is an important part of the online application. The information entered into your profile should be reviewed carefully before moving forward.
The NBI’s current instructions identify several areas that applicants need to complete, including:
| Information Area | What to Check |
|---|---|
| Personal details | Name and other identifying information |
| Family background | Required family information |
| Education | Relevant educational details |
| Employment | Employment information where applicable |
| Contact details | Active email and mobile information |
Take your time with the form. A small typing error can become more difficult to correct once the application has progressed.
Why Personal Information Matters
Your information is used as part of the clearance process, so it should be consistent with your valid identification documents.
Before saving the profile, check:
- Name spelling
- Date of birth
- Address
- Civil status
- Family information
- Education details
- Employment information
- Contact information
The NBI specifically advises applicants to ensure that the spelling of their information matches their valid IDs.
NBI Online Registration & Application
Once your account and profile are ready, you can move to the actual clearance application.
The process generally follows this order:
- Register or log in
- Complete your applicant profile
- Select “Apply for Clearance”
- Choose the valid government ID you will present
- Select an NBI branch
- Choose an available appointment
- Select a payment channel
- Save your reference number
- Complete payment
- Visit the selected NBI branch
- Complete biometrics and verification
- Receive your clearance when released
The NBI publishes this online-to-branch process on its official website.
How to Apply for NBI Clearance Online
After logging into your account, you can move from NBI online registration to the actual clearance application.

Step 1: Select “Apply for Clearance”
Open your applicant dashboard and select “Apply for Clearance.” The system will ask you to identify the valid government ID you intend to bring to the NBI branch.
Choose the ID carefully and make sure the original document is available for your appointment. The NBI advises applicants to ensure that the information entered in their profile matches their valid identification documents.
Step 2: Select an NBI Branch
Choose the NBI clearance branch that is most convenient for you. The official NBI website provides an NBI Clearance Office Locator for finding available clearance offices.
When selecting a branch, consider:
- Distance from your home or workplace
- Available appointment schedules
- Your ability to arrive on time
- Whether the selected office provides the service you need
Practical tip: Don’t choose a branch simply because it is familiar. Check the available schedule first and select a location that you can realistically reach on your appointment day.
Choose Your NBI Appointment Schedule
After selecting a branch, the online system allows you to choose an available date and time. Current NBI instructions describe appointment options in AM or PM time slots.
Before confirming the schedule, review:
| Appointment Detail | What to Check |
|---|---|
| Branch | Make sure the location is correct |
| Date | Choose a day you can attend |
| Time | Check the AM/PM selection |
| Application details | Ensure your profile information is accurate |
| Payment reference | Save it after the transaction is created |
Don’t close the page immediately after selecting your schedule. Make a record of the transaction information shown by the system.
NBI Clearance Payment and Reference Number
Payment is an important part of the NBI online registration and application process. After selecting the applicable payment channel, the system generates a Reference Number associated with your transaction. The current NBI instructions emphasise keeping this number because it is used for payment and for the branch visit.
The NBI currently lists payment channels such as:
- GCash
- Maya
- 7-Eleven
- Bayad Center
- Online banking
The NBI’s current online guide lists a basic clearance fee of ₱130, plus an e-payment service charge that may vary by payment channel. Check the amount displayed in your transaction before making payment because charges and payment options can change.
Keep Your Reference Number Safe
Your reference number is one of the most important details in the transaction.
Save it by:
- Taking a screenshot
- Writing it down
- Saving the confirmation email or message
- Keeping a digital copy of the payment record
The official NBI guide says applicants use the reference number to pay and present it as part of the branch process.
Important: Don’t share your account password or OTP with another person. Keep your payment and application information private.
What to Bring to the NBI Branch
Once your online transaction shows the appropriate paid status, prepare for your physical appearance.
The NBI’s current online application instructions state that applicants should bring their printed or digital Reference Number or QR code, proof of payment, and two valid government-issued IDs.
NBI Appointment Checklist
- NBI Reference Number or QR code
- Payment receipt or proof of payment
- Two valid government-issued IDs
- Original identification documents
- Other supporting documents, if specifically required
- First-Time Job Seeker documents, if applying under that programme
The NBI Citizen’s Charter also identifies two valid government-issued identification cards as requirements for its clearance application service.
Why Bring Original IDs?
The branch visit includes identity verification, biometric capture and image capture. Bringing the original identification documents helps the NBI verify that the person attending the appointment is the same applicant registered online.
What Happens at the NBI Branch?
The online portion doesn’t finish the entire clearance process. Applicants normally need to appear at their selected branch for the required identity and biometric procedures.
According to the NBI’s current application instructions, the branch process includes biometrics capture and data verification.
1. Present Your Transaction Details
Show your reference number or QR code and the required payment proof and IDs.
2. Complete Biometrics
NBI personnel capture the require2. Complete Biometricsd biometric information, including:
- Digital photograph
- Fingerprints
- Electronic signature
The NBI Citizen’s Charter also identifies fingerprint, image and signature capture as part of clearance processing.
3. Verify Your Information
Before the information is finalised, carefully check the details displayed by the system or officer.
Look for errors in:
- Full name
- Date of birth
- Address
- Civil status
- Other personal details
If something is incorrect, raise it with the responsible NBI personnel before the clearance is printed.
What Does “NBI HIT” Mean?
One of the most confusing parts of the NBI Clearance process is seeing a “HIT” status.
A HIT does not automatically mean that you have a criminal record. It can occur when your name is similar or identical to a name associated with information in the NBI database and additional verification is needed.
The current NBI online guide explains that a HIT may require manual review before the clearance can be released.
If You Get a HIT
Don’t panic or assume the worst.
The NBI may require you to:
- Follow the instructions provided by the clearance personnel.
- Return on the specified release or verification date.
- Complete any additional verification requested by the NBI.
The NBI has also published recent cases showing that a WITH HIT status can require further verification to determine whether the applicant is actually the person associated with a record or is simply a namesake.
No HIT vs HIT: What Is the Difference?
| Status | What It Generally Means | Next Action |
|---|---|---|
| No HIT | No matching record requiring additional review was identified | Proceed with the release process |
| HIT | A possible name or record match requires verification | Follow the NBI’s instructions for further processing |
| For Quality Control | Additional review or interview may be required in applicable cases | Follow the instructions of NBI personnel |
The exact processing time can depend on the result of the verification and the instructions given by the NBI branch.
NBI Clearance Release
If your application proceeds without a HIT or other issue requiring additional verification, the clearance can move to the printing and release stage. The NBI Citizen’s Charter lists printing as the final stage after biometric and image capture for online applicants who have completed the required process.
If your application requires further verification, you may be instructed to return on another date.
Don’t leave the branch without checking what you need to do next. If the clearance isn’t released immediately, ask the staff for the correct return date or next step.
Special Case: First-Time Job Seekers
Applicants who qualify under the First-Time Job Seekers Act (RA 11261) have a separate NBI process.
The NBI provides a dedicated online portal:
The NBI Citizen’s Charter states that qualified first-time job seekers can receive the NBI Clearance free of charge, subject to the required documents and eligibility conditions. The listed requirements include a qualifying Barangay Certification and acceptable identification documents.
For this application, don’t simply assume that the standard payment process applies. Use the dedicated first-time job seeker facility and follow the NBI’s instructions.
NBI Registration for Existing Holders
If you’ve previously received an NBI Clearance, you may have a different route from a completely new applicant.
The NBI’s current online instructions mention an NBI Clearance Online Renewal option for eligible previous clearances. The NBI also announced in July 2026 that NBI eClearance is available through the eGovPH Super App, providing an additional digital renewal route for eligible verified users.
This is particularly useful for applicants who are renewing rather than starting a new clearance application.
Common NBI Registration Mistakes
A large part of a smooth application comes down to avoiding simple mistakes.
Mistake 1: Using an Unofficial Website
Always start from the official NBI website or the official clearance portal.
Mistake 2: Entering Different Information
Your online profile should match your valid IDs. Check spelling and personal information before saving the form.
Mistake 3: Losing the Reference Number
Don’t assume you can easily recover it later. Screenshot and save it immediately after it is generated.
Mistake 4: Arriving Without the Required IDs
The NBI’s Citizen’s Charter specifies two valid government-issued IDs for its clearance application service.
Mistake 5: Ignoring a HIT Instruction
A HIT requires additional attention. Follow the branch’s instructions rather than assuming the clearance will automatically be released the same day.
NBI Online Registration Quick Checklist
Before leaving for your appointment, check:
- Your NBI online account is accessible.
- Your applicant information is accurate.
- Your appointment branch and schedule are correct.
- Your payment has been completed where applicable.
- Your reference number is saved.
- Your payment receipt is available.
- Your required IDs are ready.
- You know where your selected NBI branch is located.
The NBI’s official office locator recommends completing the online application and payment before going to the selected clearance office.
Common NBI Online Registration Problems
1. I Cannot Log In to My NBI Account
If you cannot access your account, first check that you are using the correct login details. Make sure there are no typing errors in your email address or password.
If the problem continues, use the account recovery option available on the official NBI Clearance portal rather than creating multiple accounts.
Tip: Keep the email address and mobile number associated with your registration accessible throughout the application.
2. I Did Not Receive the OTP
An OTP is used during registration to verify the applicant’s contact information. If you don’t receive it immediately:
- Check that your mobile number was entered correctly.
- Wait briefly before requesting another code.
- Make sure your phone has network coverage.
- Check whether your SMS inbox can receive new messages.
- Try again later if the service is temporarily delayed.
Never give your OTP to another person claiming to be an NBI representative.
3. My Personal Information Is Incorrect
Incorrect information should be dealt with before the application progresses as far as possible.
Review your:
- Full name
- Date of birth
- Address
- Civil status
- Family information
- Education details
- Employment information
The NBI advises applicants to make sure their information is correctly entered and that the spelling matches their valid IDs.
If the system does not allow you to make the necessary correction, contact the appropriate NBI office rather than submitting inaccurate information.
Payment Problems During NBI Registration
Payment Was Made but the Status Has Not Updated
Payment processing may not always appear immediately in your account. First, keep your payment receipt and transaction reference details.
Before paying a second time:
- Check your account again.
- Confirm the payment transaction.
- Review your email or payment confirmation.
- Keep the original receipt or electronic proof.
- Contact the appropriate NBI support channel if the payment remains unresolved.
Do not make another payment simply because the status has not changed immediately. Confirm the original transaction first to avoid an unnecessary duplicate payment.
I Lost My Payment Reference Number
If you saved a screenshot, email, SMS, or receipt, check those records first. Your reference number is an important part of the transaction, so keeping a digital copy from the beginning is a good practice.
No NBI Appointment Slots Available
Appointment availability can vary by branch and date. If your preferred location has no suitable schedule, check the system again and consider another NBI clearance office.
The official NBI website provides a Clearance Office Locator that can help applicants identify NBI clearance offices.
Before selecting another branch, make sure the location is convenient enough for you to attend on the assigned date.
Practical approach
| Problem | What to Try |
|---|---|
| Preferred branch is unavailable | Check another NBI office |
| No convenient date | Check the portal again later |
| Appointment information is incorrect | Review the transaction details |
| Branch is difficult to reach | Select a more convenient location |
| Unsure about branch availability | Use the official NBI office locator |
What If the NBI Clearance Shows “HIT”?
A HIT does not by itself establish that the applicant has a criminal record. It indicates that additional verification may be required because of a possible matching name or record.
The NBI’s published guidance explains that applicants with a HIT may need further verification before their clearance can be released.
If you receive a HIT:
- Follow the instructions given by NBI personnel.
- Keep your reference and appointment information.
- Bring the identification documents requested.
- Return on the date provided by the NBI if required.
- Do not assume that a HIT automatically means you have a record.
The final determination belongs to the NBI after its verification process.
NBI Clearance Renewal
Not every applicant needs to start from the beginning. If you already have a previous NBI Clearance, check whether the online renewal option applies to your situation.
The NBI’s current information includes an online renewal route for eligible previous clearance holders. It also announced in July 2026 that NBI eClearance is available through the eGovPH Super App for eligible verified users.
For a renewal, carefully follow the current instructions shown by the official NBI system instead of assuming that the requirements are identical to those for a first-time application.
First-Time Job Seeker NBI Clearance
Qualified first-time job seekers may be able to obtain an NBI Clearance without the standard clearance fee under the First-Time Job Seekers Act (RA 11261).
The NBI provides a dedicated portal for this service:
The NBI Citizen’s Charter states that eligible first-time job seekers must meet the relevant conditions and provide the required supporting documents, including a qualifying Barangay Certification.
Before applying as a first-time job seeker
Make sure you:
- Meet the eligibility requirements.
- Obtain the required Barangay Certification.
- Prepare acceptable identification documents.
- Use the appropriate NBI first-time job seeker process.
- Follow the current instructions shown by the official portal.
Do not claim the exemption if you do not meet the legal requirements.
Avoid NBI Registration Problems
A few simple habits can make the application considerably easier.
Use Official Sources
Begin with the official NBI website or the official NBI Clearance portal. Avoid websites that imitate government services or request unnecessary fees.
Check Your Information Twice
Before submitting your details, compare your online information with your valid IDs. This is especially important for your name and date of birth.
Save Everything
Keep digital copies of:
- Reference number
- Payment confirmation
- Appointment details
- QR code
- Important emails or messages
A screenshot can be useful if you need to explain a payment or appointment issue later.
Don’t Create Duplicate Transactions
If a payment or appointment appears delayed, first investigate the existing transaction. Creating another application immediately can make the situation more confusing.
Arrive Prepared
Bring your reference number or QR code, payment proof, and the required valid IDs. The NBI’s current instructions specify the documents applicants should present at the clearance office.
NBI Online Registration FAQs
Final Takeaway
A successful NBI online registration starts with using the correct government portal and entering accurate information. From there, the process involves creating your account, completing your profile, applying for clearance, choosing a branch and schedule, arranging payment, and attending the required in-person verification.
The safest approach is to rely on the official NBI website and NBI Clearance portal for current requirements, payment options, branch information and application instructions. Keep your reference number and payment records throughout the process, and don’t ignore any additional instructions provided by NBI personnel.
Official NBI resources:
Note: Online procedures, fees, payment channels, branch schedules and digital services can change. Always check the official NBI sources before submitting or paying for a new application.
Discover What You Need to Know:
- NBI Appointment Philippines 2026: Online Booking, Registration & Requirements Guide
- NBI Clearance Philippines 2026: Complete Guide to Registration, Fees & Requirements
- PRC Online Appointment 2026: Registration, Booking and Requirements
- GSIS Website 2026: Complete Guide to Registration, Login, Loans, Benefits & Pension
- May Huli Ka Portal: Check MMDA Violations, Fines & E-Contest